 Skip to main content
Skip to footer
Skip to main content
Skip to footer

Dungeons Dragons
Introduction to Dungeons & Dragons (D&D)
Dungeons & Dragons stands as the iconic pillar of tabletop role-playing games. Celebrating rich narratives and imaginative encounters, this game offers endless adventures in a medieval fantasy world where magic soars, and diverse creatures roam free. Here, we delve into the essence of D&D and what makes it a beloved pastime for many.
What to Expect from Dungeons & Dragons
As a D&D player, you adopt the role of a heroic character set in a fantastical realm teeming with sorcery and mythical beings. Your journey will be shared with a band of adventurers, each with unique backgrounds. Here’s what you can look forward to:
- Dynamic Encounters: Travel through enchanting landscapes, meet diverse characters, and face challenges that test your wit and bravery.
- Character Progression: Collect treasures and gain experience (XP). As your XP increases, so does your level, enhancing your abilities, spells, and overall prowess.
- Exciting Challenges: Engage in tactful combat, solve intriguing puzzles, and immerse yourself in extensive role-play and exploration.
Styles of Play
D&D is versatile, accommodating various play styles, from light-hearted and casual to intensely strategic and serious. As you embark on your tabletop journey, it’s essential to explore and identify your preferred style, enhancing your overall gaming experience.
Getting Started with Dungeons & Dragons
Contrary to popular belief, starting your D&D adventure requires nothing more than your imagination and a willingness to dive into your character’s role. Here are the basics you’ll need:
- For Offline Play:
- A set of polyhedral dice.
- Pen and paper, or a digital character sheet on your device.
- For Online Play:
- Essential tools like Discord for communication.
- Accounts on platforms like DnDBeyond and Roll20 for game management and play.
Playing the Game
The game unfolds with players gathered around a table, led by one player acting as the Dungeon Master (DM). The DM crafts the world and narrates the unfolding events, prompting players to interact with the setting through their characters.
Actions are typically performed by stating your intentions, with the DM deciding the outcome based on dice rolls augmented by character attributes. Whether engaging in battles or diplomatic encounters, the thrill of D&D comes from collective storytelling and the unpredictable nature of the dice.
Advanced Preparation
While jumping straight into a game is entirely possible, those looking to enhance their experience can:
- Download and read the basic rules available online.
- Seek resources for character creation to craft a persona that truly represents your envisioned role.
Conclusion
Dungeons & Dragons is more than just a game; it’s a doorway to a world of collaborative storytelling filled with endless possibilities. Whether you are new to the realm of tabletop RPGs or a seasoned adventurer, D&D offers a unique blend of creativity, strategic planning, and communal play. Check our calendar for local game nights or join discussions on our Discord to start your adventure today. Embrace your inner hero and let your fantasy journey begin!
Disclaimer: The rules discussed here are not a substitution for the “Player’s Handbook.” However, they will help you confidently take your first steps in D&D!
1.1 Basic Terminology:
How to Read Rolls:
-
- When you roll a die, you often add or subtract your modifier to/from the roll. Modifiers are positive (+) and negative (-) values. The final result is the outcome of the roll.
Advantage/Disadvantage:
-
- You roll a d20 twice (instead of once) to determine if you hit. Depending on whether it is a disadvantage or advantage, you take the lower or higher value, respectively.
Ability Check :
-
- Roll a d20 and add or subtract your modifier.
Saving Throw :
-
- Roll your ability score with its modifier.
Skill Check :
-
- Roll for your skill.
Exhaustion :
There are 6 levels of exhaustion. Each long rest reduces your exhaustion level by 1, with effects including:
-
- Disadvantage on ability checks.
- Halved speed.
- Disadvantage on attack rolls and saving throws.
- Maximum hit points halved.
- Zero speed.
- Death.
Resting :
-
- Long Rest :
8 hours, including 6 hours of sleep and 2 hours of light activity. You recover all spent resources
(including HP) (max 1x per 24 hours).
-
- Short Rest :
1 hour of sitting, lying down, eating, drinking, or tending to wounds. You may use your available hit
dice (+con modifier) to heal.
1.2 Conditions
– Blinded:
-
- Automatically fail any check that requires sight.
- Attacks against you have advantage.
- Your attacks have disadvantage.
– Charmed :
-
- A charmed creature cannot harm the charmer.
- The charmer has advantage on social checks against the charmed.
– Deafened :
-
- Automatically fail all ability checks that require hearing.
– Dying (not officially described):
-
- Occurs when you fall to 0 HP.
- You become “Unconscious” (See further in the list).
- From this point, you must roll a death save (1d20, 10 or higher is a success) each turn.
- Roll death saves until you either fail three times (1-9) or succeed three times (10-20). Rolls do not need to be consecutive! A critical failure counts as two failures. A critical success means you stabilize and wake up with 1hp.
- After three successes, you are no longer dying. Roll a 1d4 to determine how many hours until you awaken.
- If you fail three times, you die.
- Stabilization is possible through a medicine check of 10 or more OR using a medicine kit, so no more death saves are needed. The “Unconscious + Prone” conditions last for 1D4 hours.
– Frightened :
-
- Disadvantage on ability checks and attacks while the source of fear is in line of sight.
- Cannot willingly move closer to the source of fear.
– Grappled :
-
- Movement is 0. Voluntary movement is not possible.
– Incapacitated :
-
- Cannot take actions or reactions.
– Invisible :
-
- Invisible to the naked eye but still audible and tangible.
- Attacks directly against an invisible being have disadvantage.
- Attacks from invisibility have advantage but end the invisibility.
– Paralyzed :
-
- Cannot take actions or reactions.
- 0 movement.
- Cannot speak.
- Automatically fails Strength and Dexterity checks.
- All incoming attacks have advantage.
- Every hit within melee range is a critical hit.
– Petrified :
-
- Entirely turned to stone, with everything (except magical items) becoming solid matter.
- Cannot take actions or reactions.
- Cannot speak, see, or feel.
- All incoming attacks have advantage.
- Resistance (50%) against all damage.
- Immune (100%) to poison and disease. Existing poison/disease remains dormant.
- Weighs 10 times as much.
– Poisoned :
-
- Disadvantage on attack rolls and ability checks.
– Prone :
-
- 50% movement speed.
- Disadvantage on attack rolls.
- Incoming melee attacks have advantage.
- Incoming ranged attacks have disadvantage.
– Restrained :
-
- Movement is 0.
- Incoming attacks have advantage.
- Outgoing attacks have disadvantage.
- Disadvantage on Dexterity saves.
– Stunned :
-
- Cannot take actions or reactions.
- Movement is 0.
- Automatically fails Strength and Dexterity checks.
- Incoming attacks have advantage.
- Cannot speak coherently.
– Unconscious :
-
- Cannot take actions or reactions.
- Movement is 0.
- Cannot speak, hear, or see.
- Drops everything.
- Incoming attacks have advantage.
- Successful incoming melee attacks are automatically critical hits.
The 3 Modes of D&D
2.1 Downtime / Social
Downtime refers to what characters do when they’re not actively questing.
-
- Shopping : Try to have an idea of what you want beforehand. Don’t ask the shopkeeper for a list of everything they have; ask for what you need! Or where you might find it if not in stock. This makes the session run smoother.
- Talking with NPCs**: Interacting with NPCs can reveal valuable information, quests, or opportunities.
- There are many other downtime activities you can do, usually during a campaign. Ask your DM for suggestions.
2.2 Travel
The world in D&D is vast, and outside of cities, it’s not always safe.
Adventurers often have to cover great distances.
A standard journey lasts 8 hours (a day). For each additional hour you wish to travel, roll for potential exhaustion levels.
Pace Impacts :
– Fast :
-
- Minute : 400 ft
- Hour : 4 miles
- Day : 30 miles
- Effect : -5 on passive perception.
– Normal :
-
- Minute : 300ft
- Hour : 3 miles
- Day : 24 miles
- Effect : No specified penalty; considered the standard travel measure.
– Slow :
-
- Minute : 200ft
- Hour : 2 miles
- Day : 18 miles
- Effect : Can use stealth.
– Note that travel times and distances can vary depending on environmental variables, which your dungeon master will inform you about.
– The use of transportation means also has an effect, again depending on the type of vehicle and environmental variables.
2.3 Combat
-
- Combat is initiated by a hostile action, such as one party attacking another.
- When attackers attempt a stealthy approach through an ambush, they must roll a stealth check that equals or exceeds the passive perception of the victims.
- Victims who are surprised are unable to act during the first round of combat.
- Combat then proceeds with the rolling of “initiative”
- This roll determines the order of actors within the round.
- A round lasts “6 seconds” within the game, meaning a spell that remains active for one minute is active for 10 rounds.
2.3.1 During Your Turn, You Can:
-
- Move (use your speed): You can divide your movement before and after your (bonus) action. Moving through occupied spaces costs double movement, and an enemy occupying the space must be at least two sizes larger. Beware of opportunity attacks! (See 2.3.2)
- Take 1 Free Action :
– Briefly communicate by shouting or gesturing. Do not misuse this to provide a tactical rundown.
-
- Interact with an Object during your action/move: For example, opening a door or drawing your weapon. Doing this a second time in the same turn requires your action.
- Take 1 Action from the following list :
– Attack with conventional weapons once.
– Cast a Spell with a casting time of “1 action”. You can cast only one spell per turn, regardless of it
being an action or a bonus action. Note: Cantrips are not considered spells in this context.
– Dash : Spend your action to double your movement.
– Disengage : Use your action to move without provoking opportunity attacks.
– Dodge : For the rest of the round, attacks against you have disadvantage, and you have advantage
on Dexterity saving throws against attacks you can see, as long as you’re not incapacitated or have
0 speed.
-
- Help : Aid someone giving them advantage on the next ability check or give a friend advantage on an attack roll against an enemy within 5 feet, when the attack is rolled before the start of your next turn.
- Hide : Roll a Stealth check against the passive perception of all enemies with line of sight while you attempt to hide. This roll remains as the basis against which enemies can roll a Perception check if they actively search for you. Your first attack roll has advantage but ends your hidden status.
- Ready : Declare what action you will take upon which trigger being met. You are focused on this, consuming any required spell slot. This lasts until the start of your next turn, at which point you lose this prepared action.
- Search : Actively look for something (Perception/Investigation).
- Use an Object : Use an object that requires 1 action to use OR if it is the second object you want to use after your free action.
- Grapple : Attempt to grapple an enemy within 5ft who is no more than 1 size larger, rendering them “grappled” (see 1.2). Your Athletics vs. the target’s Athletics or Acrobatics (target’s choice).
The target can use its action to attempt to escape by making the opposing check.
– You can drag or carry the grappled target at half speed, unless it’s two or more sizes smaller. Moving a grappled creature involuntarily doesn’t provoke an attack of opportunity.
-
- Shove : Attempt to shove an enemy within 5ft and no more than 1 size larger, either knocking them prone (see 1.2) or pushing them 5ft away. Your Athletics vs. the target’s Athletics or Acrobatics (target’s choice). If the target is already incapacitated, the shove automatically succeeds.
- Use a Class Feature that requires an action.
- Perform 1 Bonus Action.
2.3.2 Outside Your Turn!
-
- Reaction :
* Each actor has one reaction per round, which always follows a trigger.
-
- Attack of Opportunity:
* When you voluntarily leave an enemy’s melee range, they can use their reaction (once per turn) to attack you in melee. Conversely, you can use your reaction to attack fleeing monsters in melee.
-
- Cover :
– You can use objects in the environment for cover (Note: this is not hiding).
– Half Cover : +2 to AC & Dexterity saving throws.
– Three-Quarters Cover : +5 to AC & Dexterity saving throws.
– Full Cover : Cannot be directly targeted, though area of effect (AoE) can still hit.
-
- When You Reach 0HP :
- If damage from a single attack drops you to 0 HP and the remaining uncounted damage exceeds your max HP, you die instantly.
– You are considered dying (see 1.2).
2.3.3 Extra Tips:
-
- Critical Hit (Natural 1 / 20)
- The minimum and maximum roll (1 or 20) often results in a worse or better outcome than average; a 1 always misses, while a 20 is always a hit.
- Skill checks do not crit! (For damage, it’s double the dice + modifier, or ask your DM!)
- Ranged Attacks have disadvantage in melee and against prone creatures.
- Melee Attacks have advantage against prone creatures.
- Improvised Weapons , or improper use of weapons, results in 1d4 damage.
1. Create an account on dndbeyond.
Disclaimer: The images used may slightly differ from what you see!
Visit the website: [http://www.dndbeyond.com/](http://www.dndbeyond.com/)
1.1 Create a New Character
When you are logged in, you will see the following bar at the top of the website. All the way to the right is your “nickname”. Click on it.

Once you click on your name, a new menu will appear. Among the options, you will find: “Characters”. Click on it.
A new, empty screen will open. Click on the button: “Create character”. The “Character creation method” page will present you with several options.
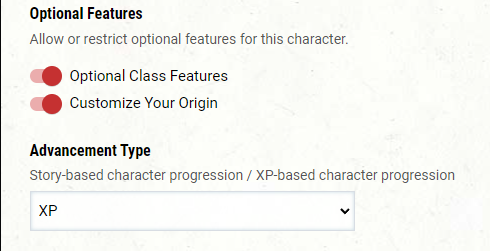
Choose “Standard”. Assign your character an image and name here. Most of the options under “preferences” on this screen are already set correctly.
However, consult with your Dungeon Master to determine which options you are allowed to select! The following options are quite common on the server for one-shots.
Then proceed by clicking the blue “next” button to the right of your name.

You will then reach the screen where you can choose your race and subrace. The choices available here depend on the books you own or those shared with you.
Sharing books works as follows:
Someone who has books and wants to share them can create a campaign and send you an invitation to join that campaign.
You don’t have to actually play in that campaign; it’s often the case that the person sharing the books prefers that you leave the campaign after creating your character.
Your character retains all its features regardless. Only when you level up might you need to briefly join this or a similar campaign again to update your character.
Building your character concept is out of the scope of this how to. But in any community people will be happy to help you with it!

Once you have completed this step, you can truly begin building your character by clicking on the blue arrow pointing to the right again. As an example, I have chosen a “Hill Dwarf,” which everyone can create. The screen will then look “approximately” as follows:
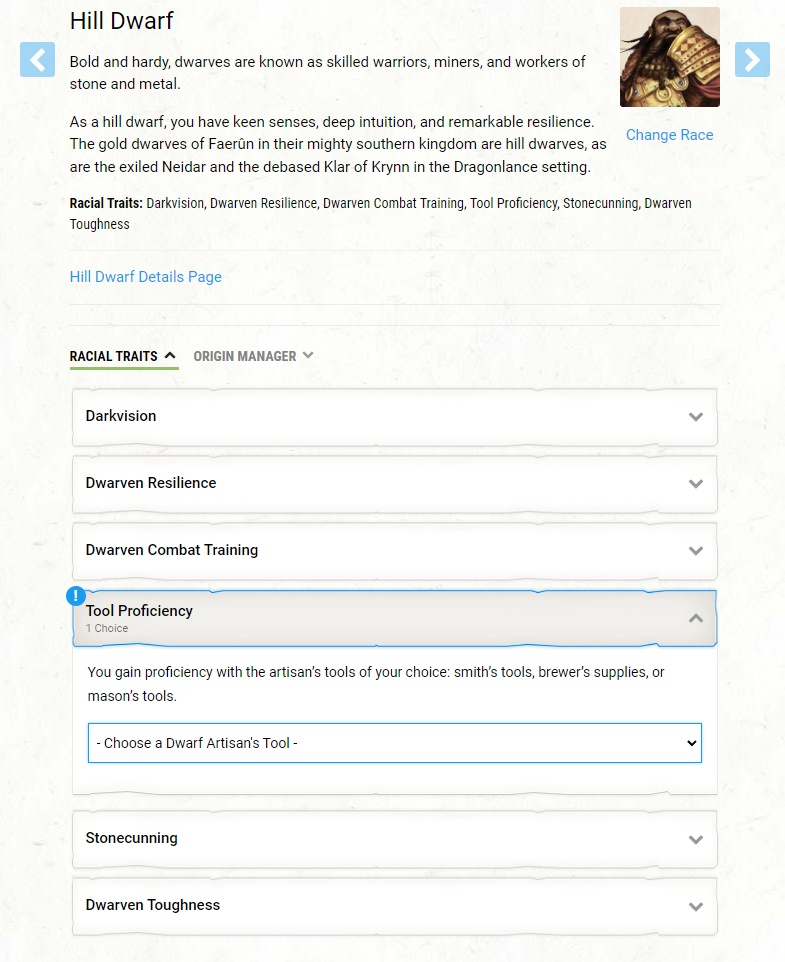
In the section on racial traits, you’ll find various characteristics that are unique to your character. It’s essential to read through them as they significantly influence your gameplay.
- Anywhere you see a blue exclamation mark, you can make adjustments. Typically, this involves tweaking ability points or selecting a feature (an extra action your character can perform).
- Often, you will be prompted to choose one or more “proficiencies.” Being proficient in something means you’re skilled at it, granting you an additional modifier. A modifier is a value you add to the result of your dice roll.
- As you level up, you’ll notice the value of this modifier increases. Eventually, you may also select “expertise,” signifying not just proficiency but true expertise in an area, doubling the proficiency modifier.
- Initially, this might not seem like much.
In the image, you’ll see “origin manager.” If you have access to “Tasha’s Cauldron of Everything” or if it’s shared with you, you can adjust many aspects here, allowing for even more customization.
Once you’ve set your racial traits, you can move on to the next screen:
“Choose a Class”
Here too, the options available depend on the books you have access to on DnDBeyond.
In the example below “Barbarian has been, chosen.
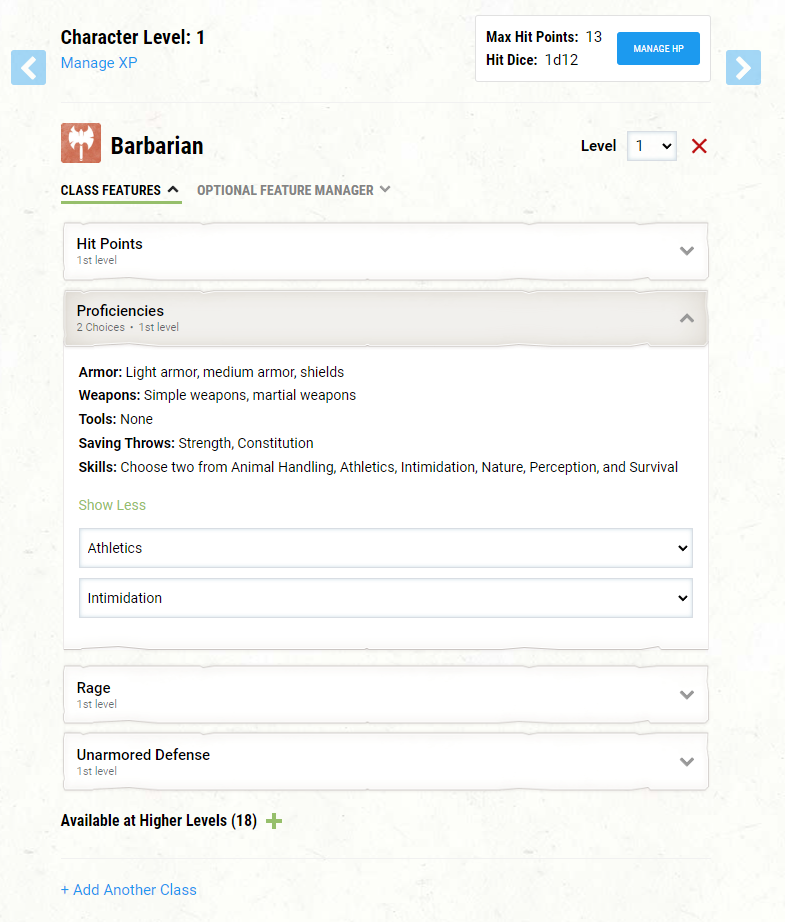
Class Features Overview
After viewing an overview of your racial traits in the previous screen, you now have an overview of the “class features.” It’s important to read through them as some options will be yours to choose. Again, you’ll have more choices available if you have access to “Tasha’s Cauldron of Everything.”
3.2.1 Ability Scores
Your character’s foundational properties are the ability scores. They largely determine the character’s strengths and weaknesses.
Here is a brief summary of each with associated skills/traits:
Strength : Pure muscle strength.
- Athletics : Physical challenges like jumping, climbing, swimming.
- Associated with clubs, axes, swords, spears, heavy armor
Dexterity : Your speed, agility, reflexes, and balance.
- Acrobatics : Moving over slippery, unstable surfaces, dodging obstacles.
- Sleight of Hand : How dexterous are you? Stealing things, or performing tasks with surgical precision.
- Stealth : Hiding yourself, slipping past unnoticed.
- Associated with bows, daggers, swords*
- Modifier is applied to initiative (impacts turn order during combat).
- Modifier is applied to your Armor Class (how difficult it is for enemies to hit you).
Constitution : General health, stamina.
- Modifier adds to HP gained every time you level up and every time you roll for HP gain.
- See basic rules for more information about hit die and short rest*
Intelligence : Pure intelligence, analytical skills, knowledge from education.
- History: Knowledge of history, legendary figures, events, wars, ancient civilizations.
- Investigation : Searching and analyzing clues to solve puzzles.
- Nature : Knowledge of plants, animals, climate, natural phenomena.
- Religion : Knowledge of gods, rituals, cults, sacred symbols.
- Arcana : General lore knowledge about all things magic.
Wisdom : Common sense, alertness, intuition.
- Animal Handling : How you interact with animals. Calming them, assessing threats, and riding them.
- Insight : The ability to gauge the true intentions of a being through body language and intuition.
- Medicine : Helping a fallen comrade avoid certain death. (see also basic rules)
- Perception : Detecting the presence or absence of things. How aware you are of your surroundings.
- Survival : Tracking, hunting, detecting natural hazards, predicting the weather.
Charisma : Your appearance, smooth talking, confidence, leadership.
- Deception : Misleading, lying, and cheating.
- Intimidation : Threatening, with or without physical violence.
- Performance : Entertaining people.
- Persuasion : Convincing people in a tactful, social manner.
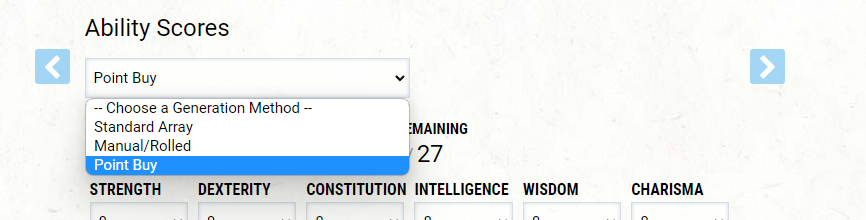
Determining Values
There are three methods for determining these scores. Nearly every quest invitation will specify which methods are allowed, usually “Standard Array” and “Point Buy.” Be sure to check!
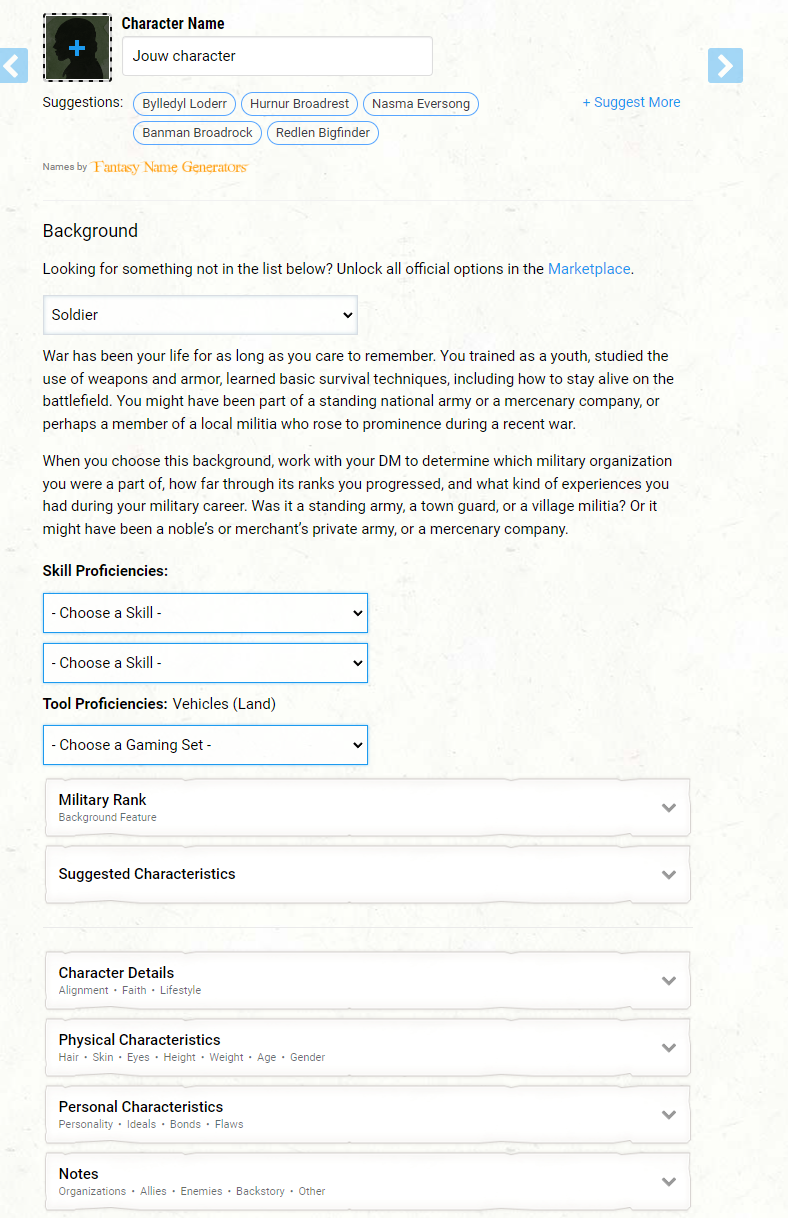
3.2.2 Background:
Choosing a Background for Your Character
- Select a Background: Choose a background that fits how you envision your character. What is your character’s past?
- Personalization: Here again, you have several choices to make.
- Character Traits : This section also allows you to detail your character’s characteristics.
Progressing to the Final Step
Once you complete this, you can move on to the final step.
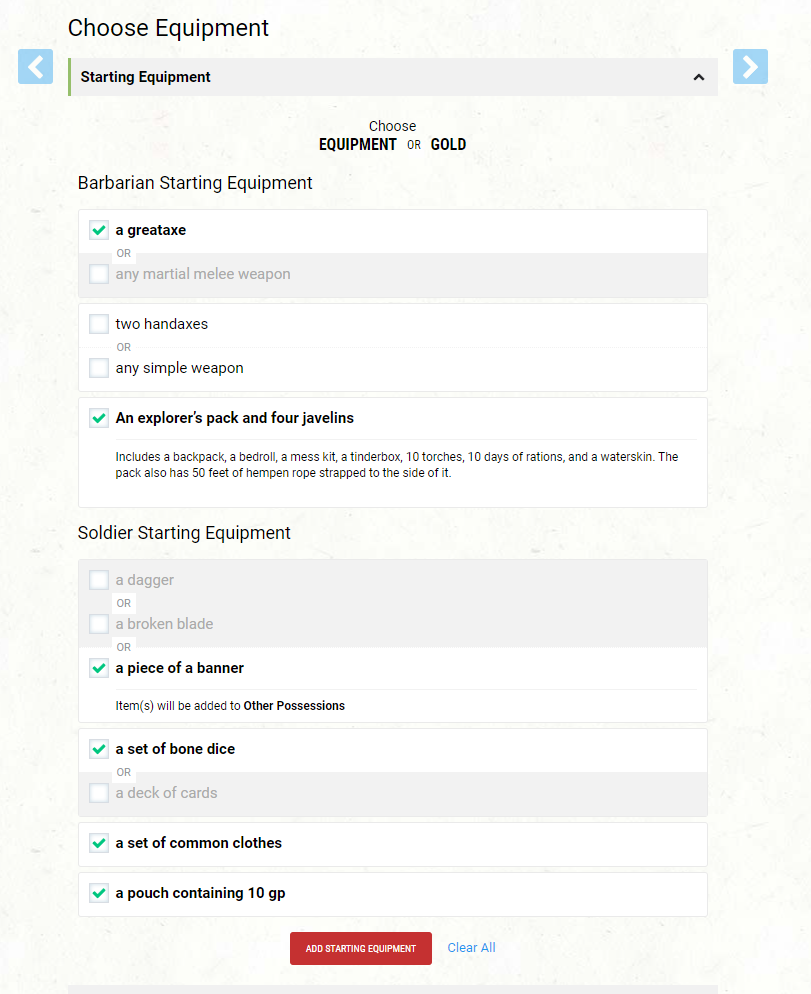
3.2.3 Starting Equipment
- Choosing Your Starting Equipment: You’ll choose between starting equipment that can include weapons, armor, and even some gold.
- This selection isn’t random but depends on your chosen class.
- Opting for Gold**: Alternatively, you can choose gold. The idea behind this option is that you purchase your equipment yourself.
- Choosing “equipment” is usually a safe bet.
- Consult Your Dungeon Master : It’s always a good idea to confirm your choices with your dungeon master!
From here go to “character sheet” :

- Your Character Sheet!
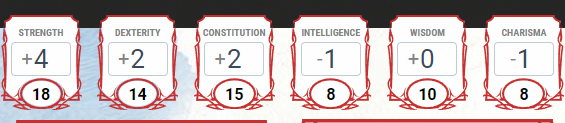
4.1 Abilities
Overview : Right at the top, you’ll see all your abilities displayed.
- Modifiers : Next to each ability, there’s a number in a square, preceded by a plus or minus sign.
– This number is your modifier, which is the value you’ll need to add to or subtract from your dice rolls.
- Actual Values : Below the modifier is the actual value of your abilities.
– You’ll want these numbers to be even, as the steps at which modifiers increase or decrease fall on even values.
- Maximum Ability Score : An ability can have a maximum score of 20.
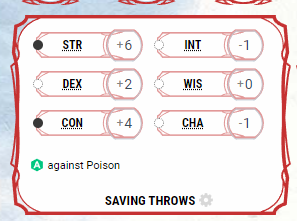
4.2 Saving Throws
- Facing Dangers : Throughout a session, you’ll frequently be exposed to various dangers.
- Resisting Harm : To resist these threats, you’ll be asked to perform a “saving throw” to determine how well you can avoid the danger.
- Proficiencies Matter : Your proficiencies also play a significant role in this process.
- Advantages/Disadvantages : You may encounter situations where you have certain advantages or disadvantages (in such cases, you roll two dice and choose the lower result!).
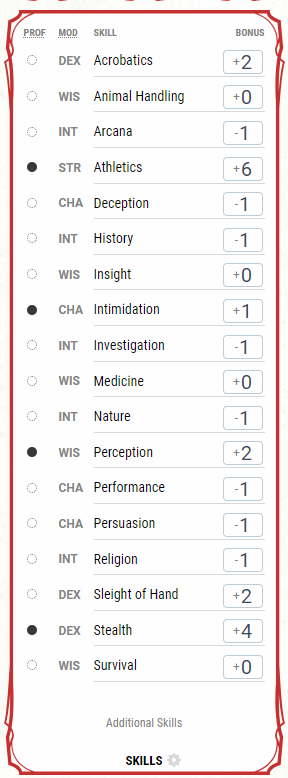
4.3 Skills
- Skills Overview : The skills are detailed under the section “3.2.1 Ability Scores.”
- Modifiers Display : Here, you will see them listed alongside your modifiers.
- Proficiency Indicators : The filled circles indicate that you are proficient in these skills.
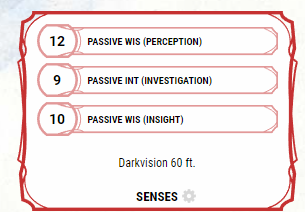
4.4 Senses
These values indicate how observant you are without actively focusing on it.
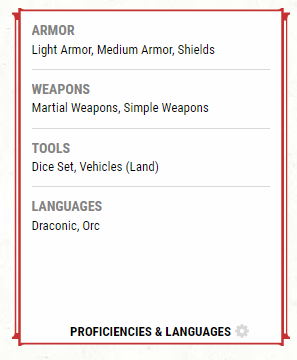
4.5 Proficiencies
- Leveraging Proficiencies : You’ll typically want to play to your proficiencies.
- Armor : If you wear armor you are not proficient in, you must make every Strength & Dexterity roll with disadvantage. Additionally, you cannot cast spells.
- Weapons : Your proficiency bonus applies to weapons you are proficient with.
- Tools : Your proficiency bonus applies to tools you are proficient with.
- Languages : You can speak and understand these languages.
4.6 Initiative/Armor Class/Defenses
- Initiative : This value (your DEX modifier) is added to each initiative roll to determine turn order.
- Armor Class (AC) : Indicates how high your armor rating is. An opponent must roll this number or higher to hit you with a direct attack (i.e., attacks not involving spells with a saving throw).
- Defenses :
Resistances : Reduces damage by half.
Immunities : You take no damage.
Vulnerabilities : Doubles the damage you take, for instance, from poison. - Conditions: Indicates which conditions are currently affecting you (e.g., blinded). For more details, see the “basic rules” in the guide that directed you here.

4.7 Everything You Can Do and Have With You!
- Review Every Option**: Go through each option and read everything carefully!
- Pro Tip : In your inventory, you can equip or unequip items such as armor and weapons. Make sure to equip what you’re actually wearing so that VTT (Virtual Tabletop) importers can take this into account!

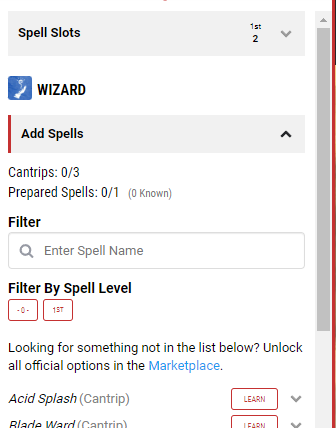
4.7.1 Managing Your Spells
The most critical area you’ll need to work on are your spells, located right next to “actions” if you have the ability to cast. For a new character, this will initially be empty. You’ll need to select “Manage Spells” to navigate to the menu from which you can add spells.
Class Dependent : The options available here are dependent on your class. The wizard class is notably recognized as the quintessential spellcaster.
Three Key Points :
- Cantrips : Do not consume spell slots.
- Known Spells : These are spells that you know or at least have in your spellbook. It’s vital to remember that known, but not prepared spells cannot be used in combat!
- Prepared Spells : These are the spells you have prepared and are ready to use.
Managing Spell Preparation
- Long Rests : Every long rest, which entails 8 hours of sleep to regenerate all your resources, allows you to prepare different spells.
- Class Limits : For most classes, the limit on the number of spells you can prepare is clearly indicated on D&D Beyond. For example, a wizard can have a spellbook full of “known” spells, should the dungeon master (DM) allow it.
- Wizards’ Exception : Since there is no hard limit for wizards, it is recommended that they follow a specific table for guidance.

- Discord
Lunch break heroes
Join Nowhttps://discord.gg/lunch-break-heroes-modules-guides-and-more-666886744532058122

The Phandalin lodge DiscordThe Phandalin lodge
Join NowThe Phandalin Lodge is a “West Marches” style D&D 5e server set in the Forgotten Realms. We host online D&D sessions and roleplay in the Lodge via chatrooms. We do not use homebrew but are lenient in character creation and worldbuilding to allow for a relaxing playstyle.


Content goes here .. (2)
Overview
Rules Summary
Character Creation
Content Reviews
Introduction to Dungeons & Dragons (D&D)
Dungeons & Dragons stands as the iconic pillar of tabletop role-playing games. Celebrating rich narratives and imaginative encounters, this game offers endless adventures in a medieval fantasy world where magic soars, and diverse creatures roam free. Here, we delve into the essence of D&D and what makes it a beloved pastime for many.
What to Expect from Dungeons & Dragons
As a D&D player, you adopt the role of a heroic character set in a fantastical realm teeming with sorcery and mythical beings. Your journey will be shared with a band of adventurers, each with unique backgrounds. Here’s what you can look forward to:
- Dynamic Encounters: Travel through enchanting landscapes, meet diverse characters, and face challenges that test your wit and bravery.
- Character Progression: Collect treasures and gain experience (XP). As your XP increases, so does your level, enhancing your abilities, spells, and overall prowess.
- Exciting Challenges: Engage in tactful combat, solve intriguing puzzles, and immerse yourself in extensive role-play and exploration.
Styles of Play
D&D is versatile, accommodating various play styles, from light-hearted and casual to intensely strategic and serious. As you embark on your tabletop journey, it’s essential to explore and identify your preferred style, enhancing your overall gaming experience.
Getting Started with Dungeons & Dragons
Contrary to popular belief, starting your D&D adventure requires nothing more than your imagination and a willingness to dive into your character’s role. Here are the basics you’ll need:
- For Offline Play:
- A set of polyhedral dice.
- Pen and paper, or a digital character sheet on your device.
- For Online Play:
- Essential tools like Discord for communication.
- Accounts on platforms like DnDBeyond and Roll20 for game management and play.
Playing the Game
The game unfolds with players gathered around a table, led by one player acting as the Dungeon Master (DM). The DM crafts the world and narrates the unfolding events, prompting players to interact with the setting through their characters.
Actions are typically performed by stating your intentions, with the DM deciding the outcome based on dice rolls augmented by character attributes. Whether engaging in battles or diplomatic encounters, the thrill of D&D comes from collective storytelling and the unpredictable nature of the dice.
Advanced Preparation
While jumping straight into a game is entirely possible, those looking to enhance their experience can:
- Download and read the basic rules available online.
- Seek resources for character creation to craft a persona that truly represents your envisioned role.
Conclusion
Dungeons & Dragons is more than just a game; it’s a doorway to a world of collaborative storytelling filled with endless possibilities. Whether you are new to the realm of tabletop RPGs or a seasoned adventurer, D&D offers a unique blend of creativity, strategic planning, and communal play. Check our calendar for local game nights or join discussions on our Discord to start your adventure today. Embrace your inner hero and let your fantasy journey begin!
Disclaimer: The rules discussed here are not a substitution for the “Player’s Handbook.” However, they will help you confidently take your first steps in D&D!
1.1 Basic Terminology:
How to Read Rolls:
-
- When you roll a die, you often add or subtract your modifier to/from the roll. Modifiers are positive (+) and negative (-) values. The final result is the outcome of the roll.
Advantage/Disadvantage:
-
- You roll a d20 twice (instead of once) to determine if you hit. Depending on whether it is a disadvantage or advantage, you take the lower or higher value, respectively.
Ability Check :
-
- Roll a d20 and add or subtract your modifier.
Saving Throw :
-
- Roll your ability score with its modifier.
Skill Check :
-
- Roll for your skill.
Exhaustion :
There are 6 levels of exhaustion. Each long rest reduces your exhaustion level by 1, with effects including:
-
- Disadvantage on ability checks.
- Halved speed.
- Disadvantage on attack rolls and saving throws.
- Maximum hit points halved.
- Zero speed.
- Death.
Resting :
-
- Long Rest :
8 hours, including 6 hours of sleep and 2 hours of light activity. You recover all spent resources
(including HP) (max 1x per 24 hours).
-
- Short Rest :
1 hour of sitting, lying down, eating, drinking, or tending to wounds. You may use your available hit
dice (+con modifier) to heal.
1.2 Conditions
– Blinded:
-
- Automatically fail any check that requires sight.
- Attacks against you have advantage.
- Your attacks have disadvantage.
– Charmed :
-
- A charmed creature cannot harm the charmer.
- The charmer has advantage on social checks against the charmed.
– Deafened :
-
- Automatically fail all ability checks that require hearing.
– Dying (not officially described):
-
- Occurs when you fall to 0 HP.
- You become “Unconscious” (See further in the list).
- From this point, you must roll a death save (1d20, 10 or higher is a success) each turn.
- Roll death saves until you either fail three times (1-9) or succeed three times (10-20). Rolls do not need to be consecutive! A critical failure counts as two failures. A critical success means you stabilize and wake up with 1hp.
- After three successes, you are no longer dying. Roll a 1d4 to determine how many hours until you awaken.
- If you fail three times, you die.
- Stabilization is possible through a medicine check of 10 or more OR using a medicine kit, so no more death saves are needed. The “Unconscious + Prone” conditions last for 1D4 hours.
– Frightened :
-
- Disadvantage on ability checks and attacks while the source of fear is in line of sight.
- Cannot willingly move closer to the source of fear.
– Grappled :
-
- Movement is 0. Voluntary movement is not possible.
– Incapacitated :
-
- Cannot take actions or reactions.
– Invisible :
-
- Invisible to the naked eye but still audible and tangible.
- Attacks directly against an invisible being have disadvantage.
- Attacks from invisibility have advantage but end the invisibility.
– Paralyzed :
-
- Cannot take actions or reactions.
- 0 movement.
- Cannot speak.
- Automatically fails Strength and Dexterity checks.
- All incoming attacks have advantage.
- Every hit within melee range is a critical hit.
– Petrified :
-
- Entirely turned to stone, with everything (except magical items) becoming solid matter.
- Cannot take actions or reactions.
- Cannot speak, see, or feel.
- All incoming attacks have advantage.
- Resistance (50%) against all damage.
- Immune (100%) to poison and disease. Existing poison/disease remains dormant.
- Weighs 10 times as much.
– Poisoned :
-
- Disadvantage on attack rolls and ability checks.
– Prone :
-
- 50% movement speed.
- Disadvantage on attack rolls.
- Incoming melee attacks have advantage.
- Incoming ranged attacks have disadvantage.
– Restrained :
-
- Movement is 0.
- Incoming attacks have advantage.
- Outgoing attacks have disadvantage.
- Disadvantage on Dexterity saves.
– Stunned :
-
- Cannot take actions or reactions.
- Movement is 0.
- Automatically fails Strength and Dexterity checks.
- Incoming attacks have advantage.
- Cannot speak coherently.
– Unconscious :
-
- Cannot take actions or reactions.
- Movement is 0.
- Cannot speak, hear, or see.
- Drops everything.
- Incoming attacks have advantage.
- Successful incoming melee attacks are automatically critical hits.
The 3 Modes of D&D
2.1 Downtime / Social
Downtime refers to what characters do when they’re not actively questing.
-
- Shopping : Try to have an idea of what you want beforehand. Don’t ask the shopkeeper for a list of everything they have; ask for what you need! Or where you might find it if not in stock. This makes the session run smoother.
- Talking with NPCs**: Interacting with NPCs can reveal valuable information, quests, or opportunities.
- There are many other downtime activities you can do, usually during a campaign. Ask your DM for suggestions.
2.2 Travel
The world in D&D is vast, and outside of cities, it’s not always safe.
Adventurers often have to cover great distances.
A standard journey lasts 8 hours (a day). For each additional hour you wish to travel, roll for potential exhaustion levels.
Pace Impacts :
– Fast :
-
- Minute : 400 ft
- Hour : 4 miles
- Day : 30 miles
- Effect : -5 on passive perception.
– Normal :
-
- Minute : 300ft
- Hour : 3 miles
- Day : 24 miles
- Effect : No specified penalty; considered the standard travel measure.
– Slow :
-
- Minute : 200ft
- Hour : 2 miles
- Day : 18 miles
- Effect : Can use stealth.
– Note that travel times and distances can vary depending on environmental variables, which your dungeon master will inform you about.
– The use of transportation means also has an effect, again depending on the type of vehicle and environmental variables.
2.3 Combat
-
- Combat is initiated by a hostile action, such as one party attacking another.
- When attackers attempt a stealthy approach through an ambush, they must roll a stealth check that equals or exceeds the passive perception of the victims.
- Victims who are surprised are unable to act during the first round of combat.
- Combat then proceeds with the rolling of “initiative”
- This roll determines the order of actors within the round.
- A round lasts “6 seconds” within the game, meaning a spell that remains active for one minute is active for 10 rounds.
2.3.1 During Your Turn, You Can:
-
- Move (use your speed): You can divide your movement before and after your (bonus) action. Moving through occupied spaces costs double movement, and an enemy occupying the space must be at least two sizes larger. Beware of opportunity attacks! (See 2.3.2)
- Take 1 Free Action :
– Briefly communicate by shouting or gesturing. Do not misuse this to provide a tactical rundown.
-
- Interact with an Object during your action/move: For example, opening a door or drawing your weapon. Doing this a second time in the same turn requires your action.
- Take 1 Action from the following list :
– Attack with conventional weapons once.
– Cast a Spell with a casting time of “1 action”. You can cast only one spell per turn, regardless of it
being an action or a bonus action. Note: Cantrips are not considered spells in this context.
– Dash : Spend your action to double your movement.
– Disengage : Use your action to move without provoking opportunity attacks.
– Dodge : For the rest of the round, attacks against you have disadvantage, and you have advantage
on Dexterity saving throws against attacks you can see, as long as you’re not incapacitated or have
0 speed.
-
- Help : Aid someone giving them advantage on the next ability check or give a friend advantage on an attack roll against an enemy within 5 feet, when the attack is rolled before the start of your next turn.
- Hide : Roll a Stealth check against the passive perception of all enemies with line of sight while you attempt to hide. This roll remains as the basis against which enemies can roll a Perception check if they actively search for you. Your first attack roll has advantage but ends your hidden status.
- Ready : Declare what action you will take upon which trigger being met. You are focused on this, consuming any required spell slot. This lasts until the start of your next turn, at which point you lose this prepared action.
- Search : Actively look for something (Perception/Investigation).
- Use an Object : Use an object that requires 1 action to use OR if it is the second object you want to use after your free action.
- Grapple : Attempt to grapple an enemy within 5ft who is no more than 1 size larger, rendering them “grappled” (see 1.2). Your Athletics vs. the target’s Athletics or Acrobatics (target’s choice).
The target can use its action to attempt to escape by making the opposing check.
– You can drag or carry the grappled target at half speed, unless it’s two or more sizes smaller. Moving a grappled creature involuntarily doesn’t provoke an attack of opportunity.
-
- Shove : Attempt to shove an enemy within 5ft and no more than 1 size larger, either knocking them prone (see 1.2) or pushing them 5ft away. Your Athletics vs. the target’s Athletics or Acrobatics (target’s choice). If the target is already incapacitated, the shove automatically succeeds.
- Use a Class Feature that requires an action.
- Perform 1 Bonus Action.
2.3.2 Outside Your Turn!
-
- Reaction :
* Each actor has one reaction per round, which always follows a trigger.
-
- Attack of Opportunity:
* When you voluntarily leave an enemy’s melee range, they can use their reaction (once per turn) to attack you in melee. Conversely, you can use your reaction to attack fleeing monsters in melee.
-
- Cover :
– You can use objects in the environment for cover (Note: this is not hiding).
– Half Cover : +2 to AC & Dexterity saving throws.
– Three-Quarters Cover : +5 to AC & Dexterity saving throws.
– Full Cover : Cannot be directly targeted, though area of effect (AoE) can still hit.
-
- When You Reach 0HP :
- If damage from a single attack drops you to 0 HP and the remaining uncounted damage exceeds your max HP, you die instantly.
– You are considered dying (see 1.2).
2.3.3 Extra Tips:
-
- Critical Hit (Natural 1 / 20)
- The minimum and maximum roll (1 or 20) often results in a worse or better outcome than average; a 1 always misses, while a 20 is always a hit.
- Skill checks do not crit! (For damage, it’s double the dice + modifier, or ask your DM!)
- Ranged Attacks have disadvantage in melee and against prone creatures.
- Melee Attacks have advantage against prone creatures.
- Improvised Weapons , or improper use of weapons, results in 1d4 damage.
1. Create an account on dndbeyond.
Disclaimer: The images used may slightly differ from what you see!
Visit the website: [http://www.dndbeyond.com/](http://www.dndbeyond.com/)
1.1 Create a New Character
When you are logged in, you will see the following bar at the top of the website. All the way to the right is your “nickname”. Click on it.
Once you click on your name, a new menu will appear. Among the options, you will find: “Characters”. Click on it.
A new, empty screen will open. Click on the button: “Create character”. The “Character creation method” page will present you with several options.
Choose “Standard”. Assign your character an image and name here. Most of the options under “preferences” on this screen are already set correctly.
However, consult with your Dungeon Master to determine which options you are allowed to select! The following options are quite common on the server for one-shots.
Then proceed by clicking the blue “next” button to the right of your name.
You will then reach the screen where you can choose your race and subrace. The choices available here depend on the books you own or those shared with you.
Sharing books works as follows:
Someone who has books and wants to share them can create a campaign and send you an invitation to join that campaign.
You don’t have to actually play in that campaign; it’s often the case that the person sharing the books prefers that you leave the campaign after creating your character.
Your character retains all its features regardless. Only when you level up might you need to briefly join this or a similar campaign again to update your character.
Building your character concept is out of the scope of this how to. But in any community people will be happy to help you with it!
Once you have completed this step, you can truly begin building your character by clicking on the blue arrow pointing to the right again. As an example, I have chosen a “Hill Dwarf,” which everyone can create. The screen will then look “approximately” as follows:
In the section on racial traits, you’ll find various characteristics that are unique to your character. It’s essential to read through them as they significantly influence your gameplay.
- Anywhere you see a blue exclamation mark, you can make adjustments. Typically, this involves tweaking ability points or selecting a feature (an extra action your character can perform).
- Often, you will be prompted to choose one or more “proficiencies.” Being proficient in something means you’re skilled at it, granting you an additional modifier. A modifier is a value you add to the result of your dice roll.
- As you level up, you’ll notice the value of this modifier increases. Eventually, you may also select “expertise,” signifying not just proficiency but true expertise in an area, doubling the proficiency modifier.
- Initially, this might not seem like much.
In the image, you’ll see “origin manager.” If you have access to “Tasha’s Cauldron of Everything” or if it’s shared with you, you can adjust many aspects here, allowing for even more customization.
Once you’ve set your racial traits, you can move on to the next screen:
“Choose a Class”
Here too, the options available depend on the books you have access to on DnDBeyond.
In the example below “Barbarian has been, chosen.
Class Features Overview
After viewing an overview of your racial traits in the previous screen, you now have an overview of the “class features.” It’s important to read through them as some options will be yours to choose. Again, you’ll have more choices available if you have access to “Tasha’s Cauldron of Everything.”
3.2.1 Ability Scores
Your character’s foundational properties are the ability scores. They largely determine the character’s strengths and weaknesses.
Here is a brief summary of each with associated skills/traits:
Strength : Pure muscle strength.
- Athletics : Physical challenges like jumping, climbing, swimming.
- Associated with clubs, axes, swords, spears, heavy armor
Dexterity : Your speed, agility, reflexes, and balance.
- Acrobatics : Moving over slippery, unstable surfaces, dodging obstacles.
- Sleight of Hand : How dexterous are you? Stealing things, or performing tasks with surgical precision.
- Stealth : Hiding yourself, slipping past unnoticed.
- Associated with bows, daggers, swords*
- Modifier is applied to initiative (impacts turn order during combat).
- Modifier is applied to your Armor Class (how difficult it is for enemies to hit you).
Constitution : General health, stamina.
- Modifier adds to HP gained every time you level up and every time you roll for HP gain.
- See basic rules for more information about hit die and short rest*
Intelligence : Pure intelligence, analytical skills, knowledge from education.
- History: Knowledge of history, legendary figures, events, wars, ancient civilizations.
- Investigation : Searching and analyzing clues to solve puzzles.
- Nature : Knowledge of plants, animals, climate, natural phenomena.
- Religion : Knowledge of gods, rituals, cults, sacred symbols.
- Arcana : General lore knowledge about all things magic.
Wisdom : Common sense, alertness, intuition.
- Animal Handling : How you interact with animals. Calming them, assessing threats, and riding them.
- Insight : The ability to gauge the true intentions of a being through body language and intuition.
- Medicine : Helping a fallen comrade avoid certain death. (see also basic rules)
- Perception : Detecting the presence or absence of things. How aware you are of your surroundings.
- Survival : Tracking, hunting, detecting natural hazards, predicting the weather.
Charisma : Your appearance, smooth talking, confidence, leadership.
- Deception : Misleading, lying, and cheating.
- Intimidation : Threatening, with or without physical violence.
- Performance : Entertaining people.
- Persuasion : Convincing people in a tactful, social manner.
Determining Values
There are three methods for determining these scores. Nearly every quest invitation will specify which methods are allowed, usually “Standard Array” and “Point Buy.” Be sure to check!
3.2.2 Background:
Choosing a Background for Your Character
- Select a Background: Choose a background that fits how you envision your character. What is your character’s past?
- Personalization: Here again, you have several choices to make.
- Character Traits : This section also allows you to detail your character’s characteristics.
Progressing to the Final Step
Once you complete this, you can move on to the final step.
3.2.3 Starting Equipment
- Choosing Your Starting Equipment: You’ll choose between starting equipment that can include weapons, armor, and even some gold.
- This selection isn’t random but depends on your chosen class.
- Opting for Gold**: Alternatively, you can choose gold. The idea behind this option is that you purchase your equipment yourself.
- Choosing “equipment” is usually a safe bet.
- Consult Your Dungeon Master : It’s always a good idea to confirm your choices with your dungeon master!
From here go to “character sheet” :
- Your Character Sheet!
4.1 Abilities
Overview : Right at the top, you’ll see all your abilities displayed.
- Modifiers : Next to each ability, there’s a number in a square, preceded by a plus or minus sign.
– This number is your modifier, which is the value you’ll need to add to or subtract from your dice rolls.
- Actual Values : Below the modifier is the actual value of your abilities.
– You’ll want these numbers to be even, as the steps at which modifiers increase or decrease fall on even values.
- Maximum Ability Score : An ability can have a maximum score of 20.
4.2 Saving Throws
- Facing Dangers : Throughout a session, you’ll frequently be exposed to various dangers.
- Resisting Harm : To resist these threats, you’ll be asked to perform a “saving throw” to determine how well you can avoid the danger.
- Proficiencies Matter : Your proficiencies also play a significant role in this process.
- Advantages/Disadvantages : You may encounter situations where you have certain advantages or disadvantages (in such cases, you roll two dice and choose the lower result!).
4.3 Skills
- Skills Overview : The skills are detailed under the section “3.2.1 Ability Scores.”
- Modifiers Display : Here, you will see them listed alongside your modifiers.
- Proficiency Indicators : The filled circles indicate that you are proficient in these skills.
4.4 Senses
These values indicate how observant you are without actively focusing on it.
4.5 Proficiencies
- Leveraging Proficiencies : You’ll typically want to play to your proficiencies.
- Armor : If you wear armor you are not proficient in, you must make every Strength & Dexterity roll with disadvantage. Additionally, you cannot cast spells.
- Weapons : Your proficiency bonus applies to weapons you are proficient with.
- Tools : Your proficiency bonus applies to tools you are proficient with.
- Languages : You can speak and understand these languages.
4.6 Initiative/Armor Class/Defenses
- Initiative : This value (your DEX modifier) is added to each initiative roll to determine turn order.
- Armor Class (AC) : Indicates how high your armor rating is. An opponent must roll this number or higher to hit you with a direct attack (i.e., attacks not involving spells with a saving throw).
- Defenses :
Resistances : Reduces damage by half.
Immunities : You take no damage.
Vulnerabilities : Doubles the damage you take, for instance, from poison. - Conditions: Indicates which conditions are currently affecting you (e.g., blinded). For more details, see the “basic rules” in the guide that directed you here.
4.7 Everything You Can Do and Have With You!
- Review Every Option**: Go through each option and read everything carefully!
- Pro Tip : In your inventory, you can equip or unequip items such as armor and weapons. Make sure to equip what you’re actually wearing so that VTT (Virtual Tabletop) importers can take this into account!
4.7.1 Managing Your Spells
The most critical area you’ll need to work on are your spells, located right next to “actions” if you have the ability to cast. For a new character, this will initially be empty. You’ll need to select “Manage Spells” to navigate to the menu from which you can add spells.
Class Dependent : The options available here are dependent on your class. The wizard class is notably recognized as the quintessential spellcaster.
Three Key Points :
- Cantrips : Do not consume spell slots.
- Known Spells : These are spells that you know or at least have in your spellbook. It’s vital to remember that known, but not prepared spells cannot be used in combat!
- Prepared Spells : These are the spells you have prepared and are ready to use.
Managing Spell Preparation
- Long Rests : Every long rest, which entails 8 hours of sleep to regenerate all your resources, allows you to prepare different spells.
- Class Limits : For most classes, the limit on the number of spells you can prepare is clearly indicated on D&D Beyond. For example, a wizard can have a spellbook full of “known” spells, should the dungeon master (DM) allow it.
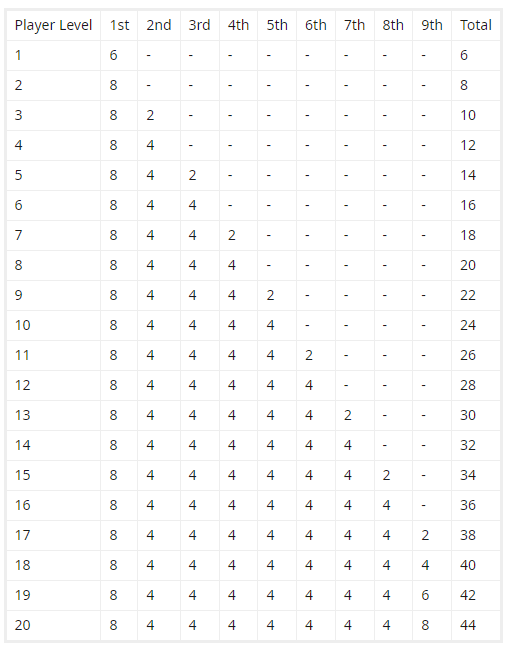
- Wizards’ Exception : Since there is no hard limit for wizards, it is recommended that they follow a specific table for guidance.

The lost mine of Phandelver

Here’s a detailed and structured review of the Dungeons & Dragons module “Lost Mine of Phandelver”:
Background
“Lost Mine of Phandelver” is widely regarded as one of the quintessential modules for introducing new players to Dungeons & Dragons. Included in the D&D Starter Set, it takes place in the Sword Coast of the Forgotten Realms, a perilous land filled with intrigue, treasure, and adventure. The story begins as players escort a wagon to the mining town of Phandalin, only to become embroiled in the area’s rich and dangerous history. With its balanced blend of exploration, combat, and roleplaying opportunities, this adventure provides a comprehensive D&D experience for both newcomers and veterans alike.
Adventure Highlights
Exploration
The module offers a diverse range of environments to explore, from the quaint town of Phandalin to the mysterious Cragmaw Castle and the ominous Wave Echo Cave. Each location is meticulously detailed, encouraging players to uncover hidden secrets and side quests. The open-ended nature of the exploration allows for player-led storytelling, where decisions and discoveries significantly impact the narrative.
Roleplay Opportunities
“Lost Mine of Phandelver” excels in providing rich roleplaying opportunities through its well-designed NPCs. Characters such as Sildar Hallwinter and the charming yet dubious townsfolk of Phandalin encourage meaningful interactions. The module creates a vibrant social landscape where alliances can be formed, reputations built, and the overarching plot can be influenced by the player’s diplomatic (or not so diplomatic) choices.
Combat
The combat encounters in this adventure are varied and strategically engaging. Players will face everything from bands of goblins to the formidable Black Spider and his minions. The combat is balanced to introduce new players to different types of enemies and tactics, ensuring that each encounter feels fresh and challenging without becoming overwhelming.
Puzzles and Challenges
The module features a range of puzzles and traps, particularly within the Wave Echo Cave, which test the players’ problem-solving skills. These elements are integrated seamlessly into the narrative, requiring both critical thinking and creativity. While not overly complex, the puzzles serve to enhance the adventure’s sense of mystery and reward.
Tips for Dungeon Masters
Spoilers ahead!
Scores
- Exploration: 9/10
The adventure provides a rich tapestry of locations and secrets, offering an expansive playground for exploration with meaningful choices and consequences. - Roleplay Opportunities: 8/10
Featuring a host of memorable NPCs and dynamic interactions, the module provides plentiful opportunities for rich roleplay. - Combat: 9/10
Balanced and varied, the combat scenarios introduce a range of challenges that keep the players on their toes, making it one of the module’s strongest elements. - Puzzles: 7/10
While not overly complex, the puzzles contribute to the story’s mystique and provide engaging breaks from combat and exploration.
Conclusion
“Lost Mine of Phandelver” stands out as an exemplary introductory module to Dungeons & Dragons, offering a well-rounded experience that captures the essence of the game. Its blend of exploration, roleplay, combat, and problem-solving ensures that players and Dungeon Masters alike will find a rewarding adventure. Whether you are new to the game or looking to bring new players into the fold, this module offers a memorable journey into the world of D&D. I’d say its the best introductory module out of the three (Lost mines of Phandelver, Dragon of Icespire peak, Dragons of Stormwreck isle).
If your interest is peaked, you should check out : Phandelver above and below. It is basically a rework and expanded into a complete campaign of the lost mine.
I hope this review helps in guiding your adventure with “Lost Mine of Phandelver”! Let me know if you need any further details or assistance.

Dragons of Stormwreck Isle
Review of the Dungeons & Dragons Module: Dragons of Stormwreck Isle
Background
Dragons of Stormwreck Isle is the most recent starter set for Dungeons & Dragons, designed as an accessible adventure for new players and Dungeon Masters (DMs). The adventure takes place on Stormwreck Isle, a mysterious island shaped by ancient conflicts between Chromatic and Metallic Dragons. This adventure provides an introduction to the world of D&D through adventurous exploration, combat, and puzzle-solving.
What’s There to Experience?
Players begin their journey through Stormwreck Isle to visit Dragon’s Rest, a temple dedicated to Bahamut and inhabited by friendly kobolds. They soon discover that a young bronze dragon wyrmling, who protects the temple, has gone missing. The adventure consists of two major side quests: solving a toxic gas problem in a Myconid cave and breaking an undead curse on a shipwreck. The final scenario includes an epic battle against a blue dragon wyrmling who wants to sacrifice the bronze dragon wyrmling in an evil ritual.
Tips for Dungeon Masters
Spoilers ahead!
- When following the scenario, Tarak has the potential to become hostile towards the party if they press too hard about the tattoo on his neck. Since he’s the quest giver for the “seagrove cave” quest, don’t take this too far!
- Use Tarak as a way to distribute potions depending on the party composition. This helps compensate for any potential lack of healing.
- The Compass Rose is the easiest quest to start with at level 1.
- Seagrove cave: each “Violet fungi” has the potential to deal 40 damage on its turn. They’re glass cannons, but if they act before the party despite their negative initiative modifier, this could cause problems.
Ratings
Exploration: 7/10
The module offers diverse paths and optional encounters, giving players freedom of choice. The limited geographical scope of the island makes navigation easier, but the discovery of the adventure’s hidden parts could use more challenge.
Roleplay Opportunities: 6/10
While there are interesting moments for roleplay, such as interactions with the kobolds and Myconids, the adventure’s central hub feels somewhat limited, and some NPCs lack memorable depth.
Combat: 8/10
Battles are well-balanced for newcomers, with varied enemies including zombies and dragon wyrmlings. The module avoids beginner clichés like orcs and goblins, introducing challenging elements such as Myconids and Harpies.
Puzzles: 5/10
The puzzles in the adventure are fairly simple and sometimes require direct guidance from the DM to lead players to the solution. There’s definitely room for more complex and challenging puzzles.
Conclusion
Dragons of Stormwreck Isle is a solid choice for new players and DMs. The adventure offers a compact and easy-to-follow structure, ideal as a beginner campaign. While it doesn’t have the depth of Lost Mines of Phandelver, it provides a fresh perspective with a focus on simplicity and accessibility.

Curse of Strahd

Reviewing the Curse of Strahd: A Deep Dive into D&D 5e’s Dark Dungeon
The Curse of Strahd, a legendary D&D 5e adventure module, has captivated tabletop roleplaying enthusiasts since its release. This gothic horror campaign, set in the haunting realm of Barovia, offers players a unique and immersive experience that sets it apart from other D&D adventures. In this comprehensive review, we’ll explore the dark corners of this beloved module and uncover what makes it a standout addition to the world of Dungeons & Dragons.
What makes Curse of Strahd a unique D&D 5e adventure?
The Curse of Strahd stands out as a pinnacle of D&D 5e adventures, offering a rich, Gothic horror experience that sets it apart from traditional fantasy campaigns. This module, published by Wizards of the Coast, draws inspiration from the original Ravenloft adventure created by Tracy and Laura Hickman. The campaign setting of Barovia, a land shrouded in mist and misery, serves as the perfect backdrop for this dark tale of vampiric terror and moral ambiguity.
How does the gothic setting of Barovia enhance the gameplay?
Barovia’s gothic atmosphere is integral to the Curse of Strahd’s unique appeal. The fog-shrouded landscapes, imposing Castle Ravenloft, and eerie villages all contribute to a palpable sense of dread that permeates every aspect of the adventure. This setting encourages players to fully immerse themselves in the roleplaying experience, as they navigate a world where danger lurks around every corner and trust is a rare commodity. The gothic elements, from crumbling ruins to ominous forests, provide Dungeon Masters (DMs) with ample opportunities to create tension and suspense throughout the campaign.
What role does Count Strahd von Zarovich play in the campaign?
At the heart of this dark tale is the vampire Count Strahd von Zarovich, a complex and terrifying antagonist who serves as both the central villain and the driving force behind the adventure. Strahd’s presence looms large over every aspect of the campaign, with his influence felt in every corner of Barovia. As a tragic figure consumed by his own desires and curses, Strahd provides players with a nuanced and challenging foe that goes beyond the typical “big bad” of many D&D adventures. The Count’s personal history, motivations, and interactions with the player characters add layers of depth to the storytelling, making him one of the most memorable villains in D&D history.
How does the Tarokka card reading mechanic impact the story?
One of the most innovative aspects of the Curse of Strahd is the incorporation of the Tarokka deck, a tarot-like card reading that shapes the course of the adventure. This unique mechanic adds an element of randomness and replayability to the campaign, as the card reading determines the locations of key items, allies, and even the final confrontation with Strahd himself. The Tarokka reading, typically performed by the fortune-teller Madam Eva, not only provides crucial information to the players but also enhances the mystical and unpredictable nature of Barovia. This mechanic allows DMs to create a truly personalized experience for their group, ensuring that no two playthroughs of the Curse of Strahd are exactly alike.
How challenging is the Death House for new players?
The Death House, an optional introductory adventure included in the Curse of Strahd module, serves as a harrowing initiation into the horrors of Barovia. This haunted mansion is designed to introduce players to the themes and challenges they’ll face throughout the campaign, but it can be particularly daunting for newcomers to D&D or the horror genre.
What level should characters be before entering Death House?
The Death House is intended for characters of 1st level, with the expectation that they will reach 3rd level by the time they complete this mini-adventure. However, the challenges within can be brutal, and inexperienced players may find themselves overwhelmed. DMs should carefully consider their group’s experience level and comfort with horror elements before deciding whether to include the Death House or to start the campaign at a higher level.
Are there any tips for DMs running Death House?
For Dungeon Masters preparing to run the Death House, it’s crucial to strike a balance between maintaining the oppressive atmosphere and ensuring player enjoyment. Some tips include: foreshadowing dangers to give players a chance to prepare, adjusting encounter difficulty based on the party’s composition, and emphasizing the importance of exploration and problem-solving over combat. DMs should also be prepared to guide new players through the more complex aspects of D&D rules, as the Death House can be unforgiving to those still learning the game.
How does Death House set the tone for the rest of the adventure?
The Death House serves as a microcosm of the larger Curse of Strahd campaign, introducing key themes and mechanics that will recur throughout the adventure. The sense of isolation, the presence of supernatural threats, and the moral ambiguity of choices made within the house all mirror the larger challenges awaiting in Barovia. By completing the Death House, players gain a taste of the horrors to come and begin to understand the dark nature of the world they’ve entered, setting the stage for the grim journey ahead.
What are the most intriguing locations in Curse of Strahd?
The Curse of Strahd is replete with fascinating and terrifying locations that bring the world of Barovia to life. From the mist-shrouded village of Barovia to the imposing Castle Ravenloft, each setting offers unique challenges and opportunities for roleplaying and exploration.
How does Castle Ravenloft compare to other D&D dungeons?
Castle Ravenloft stands as one of the most iconic and complex dungeons in D&D history. Unlike many traditional dungeons that focus primarily on combat encounters, Ravenloft is a living, breathing environment filled with mysteries, traps, and NPCs with their own agendas. The castle’s architecture is a character in itself, with secret passages, magical wards, and ever-changing layouts that challenge even the most experienced adventurers. The sheer scale and intricacy of Castle Ravenloft set it apart from other D&D dungeons, offering a multi-session exploration that serves as the climax of the entire campaign.
What secrets lie within the Amber Temple?
The Amber Temple is perhaps one of the most enigmatic and dangerous locations in the Curse of Strahd. This ancient repository of dark knowledge serves as a testament to the corrupting influence of power and the dangers of unchecked ambition. Within its halls, players will encounter forbidden lore, powerful artifacts, and temptations that can alter the course of their characters’ destinies. The Amber Temple’s significance in Barovia’s history and its connection to Strahd’s own past make it a crucial location for unraveling the mysteries of the curse that plagues the land.
How does the village of Barovia contribute to the overall atmosphere?
The village of Barovia serves as the players’ introduction to the oppressive realm of Strahd, setting the tone for the entire adventure. This bleak settlement, with its boarded-up windows, suspicious inhabitants, and ever-present mist, embodies the hopelessness and fear that permeate Strahd’s domain. The village offers numerous opportunities for roleplaying and information gathering, as players interact with traumatized villagers and uncover the first threads of the larger narrative. The presence of key locations like the Blood of the Vine tavern and St. Andral’s Church provides focal points for early quests and character development, making the village of Barovia an essential part of the campaign’s atmospheric world-building.
How can DMs effectively use the Gothic Trinket Table?
The Gothic Trinket Table included in the Curse of Strahd module is a valuable tool for Dungeon Masters looking to enhance the eerie atmosphere and personal connections within the campaign. These unique items serve as more than mere flavor text, offering opportunities for character development, plot hooks, and immersive storytelling.
What are some creative ways to incorporate gothic trinkets into the story?
DMs can use gothic trinkets as catalysts for side quests, linking them to hidden aspects of Barovia’s history or connecting them to specific NPCs. For example, a player character might possess a locket containing a portrait that bears a striking resemblance to a long-dead Barovian hero, leading to a quest to uncover their legacy. Trinkets can also serve as keys to unlock secret areas, provide cryptic clues to larger mysteries, or act as focuses for magical effects unique to Barovia. By weaving these items into the narrative, DMs can create a more richly textured and personalized experience for their players.
How do trinkets enhance character backstories?
Gothic trinkets offer an excellent opportunity for players to flesh out their characters’ backgrounds and motivations. A character might have a trinket that ties them to a dark past or a lost love, providing depth to their personal story and reasons for being in Barovia. DMs can work with players to incorporate these items into their characters’ histories, creating hooks that can be explored throughout the campaign. This not only enhances the roleplaying experience but also gives players a stronger connection to the gothic horror themes of the adventure.
Are there any particularly memorable trinkets in Curse of Strahd?
While the specific trinkets can vary based on dice rolls or DM choice, some standout examples include a clock that runs backward, a music box that plays by itself when no one is looking, or a hand mirror that shows a person’s reflection as a corpse. These eerie items perfectly capture the unsettling nature of Barovia and can lead to memorable moments of horror and intrigue. DMs are encouraged to create their own unique trinkets that tie into the themes and plots of their specific Curse of Strahd campaign, further personalizing the experience for their players.
What role do the Vistani play in Curse of Strahd?
The Vistani, a nomadic people inspired by real-world Romani culture, play a crucial role in the Curse of Strahd campaign. Their presence adds depth to the world of Barovia and provides players with both allies and potential adversaries throughout their journey.
How can DMs portray the Vistani without relying on stereotypes?
When portraying the Vistani, it’s essential for DMs to avoid harmful stereotypes and instead focus on creating nuanced, individual characters with their own motivations and personalities. The Vistani should be presented as a diverse group with varying attitudes towards Strahd and the players. DMs can emphasize their role as travelers and storytellers, highlighting their knowledge of the land and its secrets. By developing unique Vistani NPCs with distinct personalities and goals, DMs can create more authentic and respectful representations that enhance the overall narrative.
What is the significance of Madam Eva’s card reading?
Madam Eva, a prominent Vistani seer, plays a pivotal role in the Curse of Strahd through her Tarokka card reading. This fortune-telling session not only provides players with crucial information about their quest but also adds an element of mysticism and fate to the adventure. The card reading determines the locations of important artifacts, potential allies, and even the final confrontation with Strahd himself. Madam Eva’s prophecies serve as a narrative framework for the entire campaign, guiding players while maintaining the air of mystery and unpredictability that is central to the Curse of Strahd experience.
How do the Vistani impact the players’ journey through Barovia?
Throughout the campaign, the Vistani serve as a source of information, trade, and sometimes conflict for the player characters. Their camps offer rare safe havens in the dangerous land of Barovia, providing opportunities for rest, resupply, and gathering intelligence. Some Vistani may act as guides, helping players navigate the treacherous landscape, while others might have hidden agendas tied to Strahd or other powerful entities. The complex relationship between the Vistani and the rest of Barovia’s inhabitants adds layers of political and social intrigue to the adventure, challenging players to navigate the nuanced dynamics of this cursed realm.
What are the most sought-after magic items in Curse of Strahd?
The Curse of Strahd features a number of powerful and unique magic items that can greatly impact the course of the adventure. These artifacts not only provide mechanical benefits to the players but also carry significant narrative weight within the context of Barovia’s dark history.
How does the Sunsword impact gameplay against vampires?
The Sunsword is one of the most iconic and powerful items in the Curse of Strahd. This legendary weapon is particularly effective against vampires and other undead creatures, making it a crucial tool in the fight against Strahd and his minions. The Sunsword emits sunlight, a bane to vampires, and deals additional radiant damage to undead foes. Beyond its combat applications, the Sunsword’s ability to produce light in Barovia’s perpetual gloom serves as a beacon of hope for both the characters and the oppressed inhabitants of the realm. The quest to locate and reforge the Sunsword often becomes a central storyline in many Curse of Strahd campaigns.
What makes the Holy Symbol of Ravenkind a powerful artifact?
The Holy Symbol of Ravenkind is another potent item that players can acquire during their journey through Barovia. This sacred artifact has the power to turn undead, emit sunlight, and even grant limited protection against Strahd’s charm abilities. The Holy Symbol’s significance extends beyond its magical properties; it represents a legacy of resistance against Strahd’s tyranny and serves as a rallying point for those who oppose the vampire lord. DMs often use the Holy Symbol as a plot device, tying its discovery to important NPCs or locations that further immerse players in the rich lore of Barovia.
Are there any hidden or easily missed magical items in the module?
While the Sunsword and Holy Symbol of Ravenkind are well-known artifacts, the Curse of Strahd module contains several lesser-known magical items that can be easily overlooked. These include the Icon of Ravenloft, a powerful healing item hidden within the castle, and the Blood Spear of Kavan, a weapon with a dark history found in the Yester Hill area. The module also features unique items like the Gulthias Staff, which ties into the broader mythology of Barovia and can lead to interesting moral dilemmas for the players. DMs are encouraged to highlight these lesser-known items, as they can provide unexpected advantages and story hooks that enrich the overall campaign experience.
In conclusion, the Curse of Strahd stands as a masterpiece of D&D adventure design, offering a rich, immersive experience that challenges players both mechanically and narratively. From the gothic horror atmosphere of Barovia to the complex character of Strahd von Zarovich, this module provides endless opportunities for roleplaying, exploration, and unforgettable storytelling. Whether you’re a seasoned Dungeon Master or a player new to the world of D&D, the Curse of Strahd promises a dark and thrilling journey into the heart of one of the most beloved campaigns in tabletop roleplaying history.

Tomb of Annihilation

Tomb of Annihilation Review: A Deadly Dungeon Dragon Adventure
Wizards of the Coast’s Tomb of Annihilation (ToA) is a thrilling and perilous D&D adventure that takes players on a treacherous journey through the exotic jungles of Chult. This 5th edition module offers a unique blend of exploration, puzzle-solving, and intense combat, making it a standout experience for both seasoned adventurers and newcomers to the world’s greatest roleplaying game. In this comprehensive Tomb of Annihilation review, we’ll delve into the depths of this deadly dungeon crawl and examine why it has become a fan-favorite among D&D enthusiasts.
What is the Tomb of Annihilation module about?
Tomb of Annihilation is a sprawling adventure that combines elements of classic dungeon design with a vibrant, jungle setting. The module centers around a mysterious Death Curse that plagues the Forgotten Realms, causing those who’ve ever been raised from the dead to slowly wither away. This curse serves as a ticking clock, driving the urgency of the adventure and pushing players to uncover its source before it’s too late.
How does the Death Curse fit into the story?
The Death Curse is the primary catalyst for the adventure, compelling adventurers to venture into the dangerous jungles of Chult. This affliction not only affects those who have been resurrected but also prevents any form of resurrection magic from working. As a result, the stakes are incredibly high, and the pressure on the players is palpable. The curse adds a unique twist to the traditional D&D experience, forcing players to consider the consequences of death more seriously than ever before.
What role does Chult play in the adventure?
Chult serves as the exotic and perilous backdrop for the majority of the adventure. This peninsula, located in the southern part of the Forgotten Realms, is a land of dense jungles, ancient ruins, and prehistoric creatures. The module expertly utilizes this setting to create a sense of mystery and danger, with players navigating treacherous terrain, encountering fearsome dinosaurs, and exploring long-lost cities. The vibrant port city of Port Nyanzaru acts as a starting point and base of operations for the adventurers, offering a stark contrast to the wild and untamed jungle that surrounds it.
Who is the main antagonist in Tomb of Annihilation?
The primary villain of Tomb of Annihilation is the infamous lich Acererak, a name that will send shivers down the spines of longtime D&D fans. Known for his role in the classic Tomb of Horrors adventure, Acererak returns as the mastermind behind the Death Curse. His creation, the Soulmonger, is an artifact of immense power that lies hidden within the Tomb of the Nine Gods. This dungeon, located in the lost city of Omu, serves as the ultimate challenge for players brave enough to confront the ancient evil that lurks within.
How challenging is the Tomb of Annihilation for DMs and players?
Tomb of Annihilation is renowned for its difficulty, earning a reputation as one of the most challenging 5e adventures available. The module tests both players and Dungeon Masters alike, requiring quick thinking, clever problem-solving, and tactical combat skills to overcome its many obstacles.
What makes the puzzles in ToA unique?
The puzzles found within the Tomb of Annihilation, particularly those in the Tomb of the Nine Gods, are intricate and often deadly. They harken back to the classic dungeon design of earlier editions while incorporating modern sensibilities. These challenges range from complex mechanical contraptions to mind-bending riddles, forcing players to think outside the box and work together to progress. The puzzle-solving elements add a layer of intellectual engagement that sets ToA apart from more combat-focused adventures.
How deadly are the encounters in the jungle of Chult?
The jungles of Chult are teeming with danger, and the random encounter system in ToA reflects this perilous environment. Players may face everything from hostile undead and cunning yuan-ti to rampaging dinosaurs and deadly plant life. The hex crawl nature of the jungle exploration adds an element of unpredictability, keeping players on their toes and ensuring that no two expeditions through Chult are alike. The combination of environmental hazards, disease, and formidable foes makes every journey a potential grinder for unprepared adventurers.
Is Tomb of Annihilation suitable for new DMs?
While Tomb of Annihilation offers an incredibly rich and rewarding experience, it can be challenging for new Dungeon Masters to run. The complexity of the puzzles, the vast open-world exploration, and the need to balance the ticking clock of the Death Curse with player agency all require a deft hand. However, with proper preparation and a willingness to adapt, even novice DMs can successfully guide their players through this epic adventure. The module provides ample guidance and resources to help DMs navigate its intricacies.
What sets Tomb of Annihilation apart from other D&D modules?
Tomb of Annihilation distinguishes itself through its unique blend of exploration, puzzle-solving, and high-stakes adventure. The module’s ability to seamlessly integrate classic dungeon crawl elements with a vibrant, living world creates an unforgettable experience for players and DMs alike.
How does ToA compare to Curse of Strahd?
While both Tomb of Annihilation and Curse of Strahd are known for their challenging nature and dark themes, they offer distinctly different experiences. Curse of Strahd focuses on gothic horror and a more contained, atmospheric setting, while ToA embraces a pulp adventure style with its sprawling jungle and ancient ruins. ToA’s emphasis on exploration and puzzle-solving contrasts with Curse of Strahd’s focus on character-driven narrative and psychological horror. Both adventures are highly regarded, but ToA’s unique setting and mechanics set it apart in the pantheon of 5e adventures.
What unique elements does the jungle setting bring?
The jungles of Chult provide a refreshing change of pace from traditional fantasy settings. The lush, primordial landscape is filled with opportunities for exciting encounters and discoveries. From dinosaur racing in Port Nyanzaru to navigating treacherous river rapids, the setting offers a wealth of unique experiences. The inclusion of elements from real-world African and Mesoamerican cultures adds depth and richness to the world, creating a truly immersive environment for players to explore.
How does the Tomb of the Nine Gods compare to the classic Tomb of Horrors?
The Tomb of the Nine Gods pays homage to the infamous Tomb of Horrors while updating the concept for modern gameplay. While both dungeons are filled with deadly traps and fiendish puzzles, the Tomb of the Nine Gods is more expansive and varied in its challenges. It maintains the sense of dread and danger that made its predecessor legendary but incorporates more opportunities for character interaction and roleplaying. The result is a dungeon that feels both familiar and fresh, challenging players in new and exciting ways while still evoking the spirit of classic D&D adventures.
What resources does the Tomb of Annihilation provide for DMs?
Tomb of Annihilation comes equipped with a wealth of resources to assist Dungeon Masters in running this complex adventure. From detailed maps to comprehensive NPC descriptions, the module strives to give DMs the tools they need to bring the world of Chult to life.
How useful is the appendix in ToA?
The appendix in Tomb of Annihilation is an invaluable resource for DMs. It contains a treasure trove of information, including detailed monster statistics, magic items unique to the adventure, and additional rules for navigating the jungles of Chult. The appendix also provides guidance on running the hex crawl exploration, making it easier for DMs to manage the vast open world. This comprehensive section helps ensure that DMs have all the necessary information at their fingertips, streamlining gameplay and enhancing the overall experience.
What tools are available for running random encounters?
ToA offers a robust system for generating random encounters in the jungle. The module includes detailed tables that allow DMs to quickly create engaging and thematic encounters based on the party’s location and level. These tools help maintain the sense of unpredictability and danger that makes exploring Chult so exciting. Additionally, the adventure provides guidance on how to scale encounters for different party sizes and levels, ensuring that the challenges remain balanced throughout the campaign.
How well-developed are the NPCs in Port Nyanzaru?
The NPCs in Port Nyanzaru are richly detailed and diverse, offering players a wide array of potential allies, rivals, and quest-givers. From the merchant princes who rule the city to the colorful guides available for hire, each character is given enough depth to spark interesting interactions and side quests. The module provides DMs with ample information on each NPC’s motivations, personalities, and potential roles in the adventure, making it easy to bring these characters to life and integrate them seamlessly into the story.
Is Tomb of Annihilation worth playing for 5e RPG groups?
For groups seeking a challenging and immersive D&D experience, Tomb of Annihilation is absolutely worth playing. Its unique blend of exploration, puzzle-solving, and high-stakes adventure offers something for every type of player.
How replayable is the Tomb of Annihilation adventure?
Despite its linear main quest, Tomb of Annihilation offers significant replayability. The vast jungle of Chult, with its random encounters and numerous side quests, ensures that no two playthroughs are exactly alike. The open-ended nature of the hex crawl allows players to explore different areas and uncover new secrets with each adventure. Even within the Tomb of the Nine Gods, the complex puzzles and traps can be approached in various ways, leading to different outcomes and experiences.
What level range is ToA designed for?
Tomb of Annihilation is designed for characters starting at 1st level and potentially reaching 11th level or higher by the adventure’s conclusion. This wide level range allows players to experience significant character growth throughout the campaign. The module provides guidance on how to scale encounters and challenges for higher-level parties, making it adaptable for groups that wish to start at a higher level or incorporate the adventure into an ongoing campaign.
How well does ToA integrate into the Forgotten Realms setting?
While Tomb of Annihilation takes place in a relatively isolated part of the Forgotten Realms, it integrates seamlessly into the larger world. The adventure’s events have far-reaching consequences that can affect the entire setting, making it easy to connect ToA to other campaigns or adventures. The module also provides hooks and suggestions for expanding the story beyond Chult, allowing DMs to weave the adventure into a broader narrative within the Forgotten Realms.
What are the pros and cons of running Tomb of Annihilation?
As with any adventure module, Tomb of Annihilation has its strengths and potential drawbacks. Understanding these can help DMs and players decide if this adventure is right for their group.
How balanced is the difficulty throughout the module?
The difficulty in Tomb of Annihilation is generally well-balanced, but it can be unforgiving at times. The early stages of jungle exploration provide a gradual increase in challenge, allowing players to acclimate to the dangers of Chult. However, the Tomb of the Nine Gods represents a significant spike in difficulty, with deadly traps and puzzles that can frustrate unprepared parties. DMs may need to carefully manage the pacing and potentially adjust encounters to suit their group’s playstyle and experience level.
What are the strengths of the Chult setting and its inhabitants?
The Chult setting is one of the adventure’s greatest strengths. The vibrant, detailed world offers a refreshing change from traditional fantasy environments. The diverse inhabitants of Chult, from the merchant princes of Port Nyanzaru to the mysterious Aarakocra and the savage yuan-ti, provide ample opportunities for rich roleplaying experiences. The inclusion of dinosaurs and other prehistoric creatures adds an element of wonder and excitement that sets Chult apart from other D&D settings.
Are there any potential drawbacks to the module’s structure?
While the open-world nature of the jungle exploration offers great freedom, it can also lead to pacing issues if not managed carefully. Some groups may find the hex crawl tedious, and DMs might need to work to maintain momentum and keep the players engaged with the main quest. Additionally, the deadly nature of the Tomb of the Nine Gods may necessitate the use of replacement characters, which can disrupt narrative continuity. However, with proper preparation and communication between the DM and players, these potential drawbacks can be mitigated or turned into strengths that enhance the overall adventure.

Vecna: Eve of Ruin

Vecna: Eve of Ruin Review – Essential Insights for 5E Tabletop RPG Fans
As the 50th anniversary of Dungeons & Dragons approaches, Wizards of the Coast has unveiled a massive adventure path that takes players on an epic journey across the D&D multiverse. Vecna: Eve of Ruin is a high-level adventure designed to challenge even the most seasoned adventurers and Dungeon Masters alike. In this comprehensive review, we’ll explore everything you need to know about this thrilling addition to the D&D 5E lineup.
What is Vecna: Eve of Ruin and how does it fit into the 5E multiverse?
Vecna: Eve of Ruin is a high-level adventure that plunges players into a multiversal conflict with one of D&D’s most iconic villains. This epic adventure is designed to take characters from level 10 to level 20, offering a challenging and immersive experience for both players and DMs. The adventure starts with the looming threat of Vecna, the infamous lich, as he attempts to remake the multiverse in his image.
Who is Vecna and why is he important in D&D lore?
Vecna is a legendary figure in D&D history, known as one of the most powerful and cunning liches in the multiverse. His origins can be traced back to the world of Greyhawk, where he first rose to power as a mortal wizard before achieving lichdom. Vecna’s influence has spread across multiple D&D settings, making him a central figure in the game’s lore. In Eve of Ruin, players must confront Vecna and his cultists as they attempt to stop his nefarious plans.
How does the Eve of Ruin adventure connect to other D&D settings?
One of the most exciting aspects of Vecna: Eve of Ruin is its incorporation of various D&D settings, creating a truly multiversal experience. Players will journey through iconic locations such as the Forgotten Realms, Eberron, Ravenloft, and even venture into the planes of Avernus and Pandemonium. This adventure serves as a celebration of D&D’s rich history, connecting disparate worlds and storylines in a way that showcases the vastness of the D&D multiverse.
What level range is this adventure designed for?
Eve of Ruin is tailored for high-level play, starting at 10th level and taking characters all the way to level 20. This makes it an ideal continuation for groups who have completed other popular adventures like Curse of Strahd or Dungeon of the Mad Mage. The adventure’s scope and complexity are well-suited for experienced players and DMs who are looking for a challenge that pushes the boundaries of traditional 5E gameplay.
How does the Rod of Seven Parts play a role in stopping Vecna?
Central to the plot of Eve of Ruin is the legendary Rod of Seven Parts, an ancient artifact of immense power that plays a crucial role in the heroes’ quest to stop Vecna.
What is the history of the Rod of Seven Parts?
The Rod of Seven Parts is a powerful artifact with a long and storied history in D&D lore. Originally created to combat the chaotic forces of evil, the Rod was shattered and its pieces scattered across the multiverse. In Eve of Ruin, the reassembly of this ancient weapon becomes key to thwarting Vecna’s plans.
How do players collect the pieces of the Rod?
Throughout the adventure, players must embark on a multiversal scavenger hunt to locate and retrieve each piece of the Rod. This quest takes them across various planes and settings, facing challenges and adversaries unique to each location. The search for the Rod pieces serves as a driving force for the narrative, propelling the characters through diverse and exciting environments.
What powers does the assembled Rod of Seven Parts possess?
Once fully assembled, the Rod of Seven Parts grants its wielder extraordinary abilities that will be crucial in the final confrontation with Vecna. The exact powers of the Rod are kept somewhat mysterious in official materials, allowing DMs the flexibility to adapt its capabilities to their specific campaign needs. However, it’s clear that the Rod plays a pivotal role in giving the player characters a fighting chance against the godlike powers of Vecna.
What unique challenges does this high-level adventure present to DMs?
Running a high-level D&D campaign presents unique challenges for Dungeon Masters, and Eve of Ruin is no exception. This adventure pushes the boundaries of what’s possible in a 5E game, requiring DMs to navigate complex scenarios and manage powerful player characters.
How to balance encounters for powerful player characters?
One of the primary challenges in Eve of Ruin is creating balanced and engaging encounters for high-level PCs. The adventure provides guidance on scaling encounters and introduces powerful new enemies, including updated stat blocks for Vecna and other formidable foes. DMs will need to carefully manage the difficulty of encounters to ensure they remain challenging without becoming overwhelming.
Managing planar travel and multiverse exploration
Eve of Ruin’s multiversal scope means DMs must be prepared to handle planar travel and the unique characteristics of various D&D settings. From the gothic horror of Ravenloft to the magitech world of Eberron, each location presents its own set of rules and challenges. The adventure provides tools and advice for managing these transitions, but DMs will need to be flexible and creative in their approach.
Incorporating epic-level NPCs and villains
As players progress through the adventure, they’ll encounter legendary figures from D&D lore, including powerful wizards like Mordenkainen and Tasha. Managing these epic-level NPCs requires a delicate balance, ensuring they enhance the story without overshadowing the player characters. The adventure offers guidance on roleplaying these iconic figures and integrating them into the narrative.
Which iconic D&D NPCs and locations are featured in Vecna: Eve of Ruin?
One of the most exciting aspects of Eve of Ruin is its incorporation of beloved characters and locations from across the D&D multiverse.
Familiar faces: Mordenkainen, Tasha, and other legendary wizards
Players will have the opportunity to interact with some of the most powerful and influential figures in D&D history. Mordenkainen, the archmage of Greyhawk, plays a significant role in the adventure, offering guidance and assistance to the heroes. Tasha, the infamous witch queen, also makes an appearance, bringing her unique brand of chaos and magic to the story. Other notable NPCs include Alustriel of the Forgotten Realms and even reformed villains who may aid in the fight against Vecna.
Exploring classic settings: Greyhawk, Forgotten Realms, and beyond
Eve of Ruin takes players on a tour of iconic D&D settings, each with its own distinct flavor and challenges. From the high fantasy of the Forgotten Realms to the gritty world of Greyhawk, the adventure showcases the diversity of the D&D multiverse. Players might find themselves navigating the streets of Neverwinter one moment and exploring the mist-shrouded domains of Ravenloft the next.
New and reimagined locations in the adventure
In addition to familiar settings, Eve of Ruin introduces new and reimagined locations that add fresh excitement to the D&D landscape. The Tomb of Wayward Souls, a mysterious vault that serves as a nexus point between worlds, plays a crucial role in the adventure. Players will also explore unique planar locations, including a revamped version of Sigil, the City of Doors, which serves as a hub for multiversal travel.
How does Vecna: Eve of Ruin compare to other high-level 5E adventures?
As a high-level adventure, Eve of Ruin naturally invites comparison to other epic D&D campaigns.
Similarities and differences with adventures like Dungeon of the Mad Mage
While both Eve of Ruin and Dungeon of the Mad Mage cater to high-level play, they offer distinctly different experiences. Where Mad Mage focuses on a massive dungeon crawl, Eve of Ruin presents a more varied, multiversal adventure. The emphasis on planar travel and world-hopping in Eve of Ruin sets it apart, offering a broader scope than the contained environment of Undermountain.
Unique elements that set Eve of Ruin apart
Eve of Ruin distinguishes itself through its multiversal approach and the central role of Vecna as the primary antagonist. The adventure’s focus on collecting the pieces of the Rod of Seven Parts provides a clear objective that drives the narrative forward. Additionally, the incorporation of iconic D&D characters and locations from various settings creates a sense of grandeur and nostalgia that’s unique to this adventure.
Replayability and adaptability for different campaign styles
Despite its epic scope, Eve of Ruin is designed with replayability in mind. The modular nature of the quest for the Rod pieces allows DMs to rearrange or replace sections to suit their campaign needs. The adventure also provides suggestions for adapting the story to different play styles, whether groups prefer combat-heavy dungeon delves or intrigue-filled political machinations.
What new game mechanics and options does Eve of Ruin introduce for players and DMs?
Eve of Ruin brings a host of new content to enhance the 5E gameplay experience.
New spells, magic items, and artifacts
The adventure introduces a variety of new spells and magic items tailored for high-level play. These include powerful artifacts linked to Vecna and other legendary figures, as well as unique items that aid in multiversal travel. New spells expand the magical repertoire of spellcasters, offering fresh options for both combat and utility.
Updated stat blocks for Vecna and other powerful entities
Eve of Ruin provides updated and expanded stat blocks for Vecna and other formidable creatures. These new stat blocks are designed to challenge high-level parties and reflect the epic nature of the adventure. DMs will find these resources valuable for creating memorable and challenging encounters.
Optional rules for epic-level play
Recognizing the unique challenges of high-level campaigns, Eve of Ruin offers optional rules and guidelines for epic-level play. These include suggestions for managing powerful abilities, handling planar travel, and scaling encounters for parties that have grown beyond the traditional level cap. These tools give DMs the flexibility to tailor the adventure to their group’s specific needs and preferences.
In conclusion, Vecna: Eve of Ruin stands as a monumental addition to the D&D 5E lineup, offering a thrilling high-level adventure that spans the multiverse. With its rich lore, challenging gameplay, and innovative mechanics, this adventure provides everything you need to craft an unforgettable campaign. Whether you’re a seasoned DM looking for your next epic story or a player eager to test your skills against one of D&D’s most infamous villains, Eve of Ruin promises an exciting journey through the vast tapestry of the D&D multiverse.

Dungeons of Drakkenheim
Exploring the Dungeons of Drakkenheim
Welcome to the dark and mysterious world of Drakkenheim, a realm where arcane magic and eldritch contamination intertwine to create a unique and thrilling adventure. This article will delve into the depths of the Dungeons of Drakkenheim, exploring its rich history, factions, and the challenges that await brave adventurers who dare to enter this haunted city.
What is the World of Drakkenheim and its history?
The World of Drakkenheim is a dark fantasy setting created by the Dungeon Dudes, Kelly McLaughlin and Monty Martin. This captivating realm centers around the ruined city of Drakkenheim, a once-thriving metropolis that now lies in ruins, contaminated by a mysterious substance known as Delerium. The city’s fall from grace serves as the backdrop for countless adventures and the motivation for adventuring in Drakkenheim is represented by the desire to uncover its secrets and potentially decide the fate of Drakkenheim itself.
How did the city of Drakkenheim fall into ruin?
The city of Drakkenheim met its doom during an event known as the Falling Fire. This cataclysmic occurrence saw a meteor of otherworldly origin crash into the heart of the city, unleashing a wave of destruction and magical contamination. The impact not only devastated the physical structures but also introduced the mysterious substance called Delerium, which now permeates the ruins and affects all who dwell in Drakkenheim. This event transformed the once-proud city into a dangerous and alluring destination for those seeking power, knowledge, or redemption.
Who are the key factions in Drakkenheim?
Several factions vie for control and influence within the ruins of Drakkenheim. The Knights of the Silver Order, once protectors of the city, now struggle to maintain order and protect the survivors. The Hooded Lanterns, a group of investigators and monster hunters, seek to understand and contain the eldritch contamination. The Amethyst Academy, a collective of mages and scholars, studies the new magic and arcane phenomena unleashed by the Falling Fire. Additionally, the Queen of Thieves leads a network of rogues and scavengers who exploit the chaos for their own gain. These factions, along with others, create a complex web of alliances and conflicts that player characters must navigate throughout their Drakkenheim campaign.
What role does the Amethyst Academy play?
The Amethyst Academy stands as a beacon of magical knowledge and research within the ruins of Drakkenheim. Composed of mages and scholars from various backgrounds, the Academy is ideally suited to crafting magic items and unraveling the mysteries of Delerium. Their presence in Drakkenheim is crucial, as they work tirelessly to understand the new spells and arcane magic that have manifested since the Falling Fire. The Academy also serves as a potential ally or employer for adventurers, offering quests related to magical artifacts and the study of eldritch phenomena found throughout Drakkenheim.
How does Delerium impact the Dungeons of Drakkenheim?
Delerium, the mysterious substance introduced during the Falling Fire, plays a central role in shaping the Dungeons of Drakkenheim. This otherworldly material permeates the ruins, influencing the environment, creatures, and even the fabric of reality itself. Its presence has transformed Drakkenheim into a place of both wonder and horror, where the laws of nature bend and new forms of magic arise.
What are the effects of Delerium on characters?
As player characters explore the ruins of Drakkenheim, they inevitably come into contact with Delerium. This exposure can lead to various effects, both beneficial and detrimental. Characters may gain access to new magical abilities or enhanced physical prowess, but at the cost of potential corruption or madness. The Game Master can use Delerium as a tool to introduce unique character developments and challenges, forcing players to weigh the risks and rewards of embracing this dangerous substance.
How is Delerium connected to new magic and spells?
The introduction of Delerium has given rise to entirely new forms of magic within the world of Drakkenheim. Mages and spellcasters who learn these spells gain access to powerful and unpredictable abilities, often tinged with an eldritch flavor. The Amethyst Academy plays a crucial role in researching and cataloging these new spells, offering players the opportunity to expand their magical repertoire in ways previously thought impossible. However, the use of Delerium-infused magic comes with its own risks, as the line between arcane mastery and corruption becomes increasingly blurred.
What is the relationship between Delerium and eldritch contamination?
Eldritch contamination is a direct result of prolonged exposure to Delerium. As characters spend more time in Drakkenheim and interact with Delerium-infused objects or creatures, they risk becoming contaminated themselves. This contamination manifests in various ways, from physical mutations to mental instabilities, and can dramatically alter a character’s appearance and abilities. The relationship between Delerium and eldritch contamination is a central theme in the Drakkenheim campaign, challenging players to balance their desire for power with the need to maintain their humanity.
What adventures await in the City of Drakkenheim?
The City of Drakkenheim offers a wealth of adventure opportunities for intrepid explorers. From delving into monster-infested ruins to navigating the complex political landscape of rival factions, there’s no shortage of excitement to be found within the city’s contaminated walls. The Drakkenheim campaign provides a rich tapestry of quests, mysteries, and conflicts for players to engage with, ensuring that every session is filled with thrilling encounters and meaningful choices.
What types of quests can players expect to encounter?
Adventurers in Drakkenheim may find themselves undertaking a wide variety of quests. These can range from recovering valuable artifacts for the Amethyst Academy to protecting innocent survivors from the dangers that lurk in the ruins. Players might be tasked with investigating strange occurrences related to the new magic permeating the city or engaging in dangerous pilgrimages to Drakkenheim to take on greater responsibilities within their chosen faction. The diverse nature of these quests ensures that each player character can find motivation for adventuring in Drakkenheim that aligns with their individual goals and backstory.
How do personal quests integrate into the Drakkenheim campaign?
Personal quests play a significant role in the Drakkenheim campaign, allowing players to develop their characters’ backgrounds and motivations. These individualized storylines can be seamlessly woven into the larger narrative, providing opportunities for character growth and development. For example, a character might embark on a quest to find a lost family heirloom within the ruins, only to discover that it has been transformed by Delerium into a powerful magical item. These personal quests add depth to the overall campaign and give players a stronger connection to the world of Drakkenheim.
What unique locations can be found throughout Drakkenheim?
Drakkenheim is home to numerous intriguing and dangerous locations that adventurers can explore. The Inscrutable Tower stands as a mysterious landmark, its purpose and contents unknown even to the most knowledgeable scholars. The throne of Drakkenheim, once the seat of power, now lies abandoned and possibly cursed. Hidden laboratories of the Amethyst Academy, secret hideouts of the Queen of Thieves, and forgotten temples contaminated by eldritch energies are just a few examples of the unique sites that can be found throughout Drakkenheim. Each location offers its own set of challenges and rewards, enticing players to delve deeper into the ruined city.
Who is the mysterious Rat Prince and what is his role?
The Rat Prince is an enigmatic figure who has risen to prominence in the aftermath of Drakkenheim’s fall. Shrouded in mystery and rumor, this character plays a significant role in shaping the underground dynamics of the ruined city. The Rat Prince’s true identity and motivations remain unclear, adding an element of intrigue to the Drakkenheim campaign.
How does the Rat Prince influence the fate of Drakkenheim?
The Rat Prince wields considerable influence over the darker aspects of Drakkenheim’s society. Through a network of spies, thieves, and other unsavory characters, he manipulates events from the shadows. His actions can have far-reaching consequences, affecting the balance of power between factions and potentially altering the course of the city’s future. Players may find themselves either working alongside the Rat Prince or opposing his schemes, depending on their allegiances and personal goals.
What is the connection between the Rat Prince and the Queen of Thieves?
The relationship between the Rat Prince and the Queen of Thieves is a complex one, filled with rivalry, mutual respect, and hidden agendas. While both operate within the criminal underworld of Drakkenheim, their methods and objectives often differ. The Queen of Thieves maintains a more visible presence, leading her band of rogues in daring heists and scavenging operations. In contrast, the Rat Prince prefers to work from the shadows, his true reach unknown even to his closest associates. This dynamic creates opportunities for intrigue and conflicting loyalties as players navigate the treacherous waters of Drakkenheim’s underworld.
What challenges do adventurers face in the Dungeons of Drakkenheim?
The Dungeons of Drakkenheim present a myriad of challenges for even the most seasoned adventurers. From the ever-present threat of Delerium contamination to the dangerous creatures that now inhabit the ruins, survival in this hostile environment requires skill, wit, and no small amount of luck. The city’s labyrinthine structure, altered by the Falling Fire and subsequent decay, creates a constantly shifting landscape where danger lurks around every corner.
How do monsters and rival factions affect gameplay?
Monsters and rival factions play a crucial role in shaping the gameplay experience within Drakkenheim. New monsters, warped by Delerium and eldritch energies, pose unique threats that challenge traditional combat strategies. These creatures, along with the ever-present rival factions, create a dynamic and unpredictable environment. Players must navigate complex social and political landscapes while also contending with the physical dangers of the ruins. The interactions between these elements ensure that no two adventures in Drakkenheim are ever quite the same.
What is the significance of the Inscrutable Tower?
The Inscrutable Tower stands as one of Drakkenheim’s most enigmatic landmarks. This imposing structure, seemingly untouched by the devastation that befell the rest of the city, is a source of endless speculation and mystery. Many believe that the tower holds the key to understanding the true nature of Delerium and the events that led to Drakkenheim’s downfall. As such, it serves as a focal point for various quests and conflicts within the campaign. The secrets hidden within the Inscrutable Tower have the potential to dramatically alter the fate of Drakkenheim, making it a highly sought-after prize for adventurers and factions alike.
How does arcane magic manifest in this dark fantasy setting?
Arcane magic in Drakkenheim has been profoundly affected by the presence of Delerium and the aftermath of the Falling Fire. Traditional spells may behave unpredictably, while new forms of magic have emerged, drawing upon the eldritch energies that now permeate the ruins. This altered magical landscape presents both opportunities and dangers for spellcasters. The Amethyst Academy works tirelessly to understand and harness these new magical phenomena, while other factions seek to exploit them for their own ends. Players who choose to wield magic in Drakkenheim must be prepared for the unexpected, as the boundaries between arcane power and eldritch corruption become increasingly blurred.
What resources are available for Game Masters running a Drakkenheim campaign?
Game Masters looking to run a Drakkenheim campaign have access to a wealth of resources to help bring this dark fantasy world to life. The Dungeon Dudes, creators of the setting, have provided extensive materials including campaign guides, maps, and supplementary content. These resources offer detailed information on the city’s history, factions, and key locations, allowing GMs to craft immersive and engaging adventures for their players.
How can GMs incorporate new monsters and magic items?
The world of Drakkenheim offers Game Masters the opportunity to introduce a variety of new monsters and magic items that are unique to this setting. GMs can draw inspiration from the eldritch themes and Delerium-infused environment to create creatures that are both terrifying and intriguing. Similarly, new magic items can be crafted to reflect the altered arcane landscape of Drakkenheim, providing players with powerful tools that come with their own risks and consequences. By incorporating these elements, GMs can ensure that their Drakkenheim campaign feels fresh and exciting, even for experienced players.
What role do the Knights of the Silver Order and Hooded Lanterns play?
The Knights of the Silver Order and the Hooded Lanterns are two prominent factions that can significantly impact a Drakkenheim campaign. The Knights, once the city’s protectors, now struggle to maintain order and defend the survivors who still dwell in Drakkenheim. Their presence offers opportunities for quests related to rescue missions, monster hunts, and the defense of key locations. The Hooded Lanterns, focused on investigating and containing the eldritch contamination, provide a wealth of mystery-solving and exploration-based adventures. GMs can use these factions to create tension, alliances, and conflicts that drive the narrative forward and give players meaningful choices in shaping the fate of Drakkenheim.
How can the Falling Fire event be used to enhance the narrative?
The Falling Fire event serves as a crucial backdrop for any Drakkenheim campaign, offering numerous opportunities to enhance the narrative. GMs can use this cataclysmic occurrence as a source of ongoing mysteries and revelations throughout the campaign. Players might uncover clues about the true nature of the meteor that struck the city, or discover long-lost artifacts that were transformed by the event. The lingering effects of the Falling Fire, such as pockets of intense magical energy or time-warped areas, can create unique and challenging encounters. By weaving the consequences of this event throughout their storytelling, GMs can create a rich, interconnected narrative that keeps players engaged and invested in the world of Drakkenheim.

out of the Abyss

Exploring the Abyss: A DnD 5E Review of This Epic Dungeon Adventure
Embark on an unforgettable journey into the depths of darkness with D&D’s Out of the Abyss, a thrilling 5th edition adventure that plunges players into the treacherous Underdark. This epic campaign, part of the Rage of Demons storyline, challenges adventurers to navigate the perils of a vast subterranean realm while confronting the looming threat of demon lords. In this review, we’ll delve into the intricacies of this complex and immersive Dungeon & Dragons experience, exploring its unique mechanics, memorable locations, and the demonic influence that permeates every shadow.
What is the Underdark and how does it relate to the Abyss?
Exploring the vast underground realm of the Underdark
The Underdark is a sprawling network of caverns, tunnels, and underground cities that exists beneath the surface of the Forgotten Realms. This dark and foreboding realm is home to a myriad of dangerous creatures and complex societies, making it a perfect setting for a challenging D&D adventure. As players descend into this subterranean world, they’ll encounter treacherous terrain, hostile inhabitants, and the ever-present threat of collapse or losing their way in the labyrinthine passages.
Understanding the connection between the Underdark and the Abyss
The relationship between the Underdark and the Abyss is a central theme in this adventure. The Abyss, an infinite plane of chaos and evil, has begun to bleed into the Underdark through portals to the demonic Abyss. This intrusion has unleashed powerful demon lords into the already dangerous underground realm, creating a perfect storm of chaos and destruction. As the PCs navigate the Underdark, they’ll witness firsthand the corrupting influence of the Abyss and its denizens, adding an extra layer of tension and urgency to their quest.
Key locations and inhabitants of the Underdark
Throughout their journey, adventurers will encounter a diverse array of locations and inhabitants that bring the Underdark to life. From the drow-controlled city of Menzoberranzan to the fungal paradise of Neverlight Grove, each area presents unique challenges and opportunities for exploration. The Underdark is home to various races and creatures, including dark elves, deep gnomes, and monstrous aberrations like beholders and gelatinous cubes. NPCs such as Stool, a myconid sprout, and Derendil, an elven prince, add depth and personality to the adventure, providing potential allies or complications for the party.
How do Drow society and politics impact the adventure?
The role of Menzoberranzan in the campaign
Menzoberranzan, the infamous drow city, plays a crucial role in the Out of the Abyss adventure. This dark elf metropolis serves as a hub of intrigue, power, and danger within the Underdark. The city’s complex social hierarchy and ruthless politics provide a backdrop for intense roleplay and challenging encounters. Players may find themselves navigating the treacherous waters of drow society, dealing with the machinations of noble houses, or confronting the powerful clergy of Lolth, the Spider Queen.
Navigating Drow intrigue and power struggles
The drow society’s intricate web of alliances, betrayals, and power struggles offers rich opportunities for storytelling and character development. As the PCs interact with various drow factions, they’ll need to carefully consider their actions and allegiances. The presence of demon lords in the Underdark further complicates the political landscape, as some drow seek to harness demonic power for their own gain. This dynamic environment challenges players to think critically and make difficult choices that can have far-reaching consequences.
Encountering notable Drow NPCs
Throughout the adventure, players will encounter several prominent drow NPCs who can significantly impact the story. One such character is Gromph Baenre, the Archmage of Menzoberranzan, whose actions play a crucial role in the unfolding events. Other notable drow, such as members of powerful noble houses or renegades like the legendary Drizzt Do’Urden, may cross paths with the party, offering potential allies, adversaries, or sources of valuable information. These interactions provide opportunities for the Dungeon Master to bring the complex world of the drow to life and create memorable moments for the players.
What are the major locations players will explore in the Underdark?
Traversing the treacherous Darklake
The Darklake is a vast underground body of water that serves as a major transportation route and obstacle in the Underdark. Navigating its dark waters presents unique challenges, from dangerous aquatic creatures to the risk of getting lost in its maze-like channels. The Darklake also connects various important locations in the adventure, making it a crucial part of the players’ journey. Encounters on and around the Darklake can range from battles with kuo-toa raiders to negotiations with other travelers, providing diverse and exciting gameplay experiences.
Discovering the secrets of Blingdenstone
Blingdenstone, the ancient home of the deep gnomes (svirfneblin), is another key location in the Out of the Abyss adventure. This once-thriving city now stands as a shadow of its former self, struggling to rebuild after years of abandonment. As players explore Blingdenstone, they’ll uncover its rich history, interact with the resilient svirfneblin inhabitants, and potentially aid in the city’s restoration. The location offers opportunities for diplomatic roleplaying, dungeon delving, and confronting the lingering threats that plague the deep gnome community.
Uncovering the mysteries of Gauntlgrym
Gauntlgrym, the legendary dwarven city, is a marvel of ancient engineering and magical craftsmanship. This massive underground complex holds many secrets and powerful artifacts, making it a tempting destination for adventurers. As players explore Gauntlgrym, they may encounter remnants of its dwarven creators, face off against monstrous inhabitants, or uncover clues about the demon lords’ plans. The city’s vast halls and intricate mechanisms provide an excellent backdrop for epic battles, puzzles, and revelations that can shape the course of the campaign.
How do random encounters and the Pursuit Level system work in this adventure?
Understanding the Pursuit Level mechanic
The Pursuit Level system is a unique mechanic introduced in Out of the Abyss to represent the constant threat of being hunted by drow or other Underdark denizens. As players travel through the Underdark, their actions and choices can increase or decrease the Pursuit Level, affecting the frequency and difficulty of random encounters. This system adds tension and urgency to the adventure, forcing players to balance their need for rest and exploration with the risk of being caught by their pursuers.
Types of random encounters in the Underdark
Random encounters in the Underdark are diverse and challenging, reflecting the dangerous and unpredictable nature of this subterranean realm. Players may face off against roving bands of drow, stumble upon bizarre fungi with strange effects, or encounter otherworldly horrors spawned by the influence of the Abyss. These encounters not only provide exciting combat opportunities but also chances for exploration, roleplay, and discovery. The DM can use these encounters to introduce new plot threads, foreshadow upcoming challenges, or simply reinforce the alien and hostile nature of the Underdark.
Balancing exploration and danger
One of the key challenges for both players and the Dungeon Master in Out of the Abyss is striking a balance between exploration and danger. The vast, interconnected nature of the Underdark invites curiosity and discovery, but every detour or extended rest carries the risk of increasing the Pursuit Level or triggering dangerous encounters. This tension creates a dynamic and engaging gameplay experience, where players must carefully weigh their decisions and resources. The DM plays a crucial role in managing this balance, using the Pursuit Level system and random encounters to maintain an appropriate level of challenge and excitement throughout the adventure.
What role do Demon Lords play in the campaign?
Confronting Demogorgon and other Demon Lords
The presence of Demon Lords, such as the terrifying Demogorgon, is a central element of the Out of the Abyss adventure. These immensely powerful beings have been unleashed upon the Underdark, wreaking havoc and corruption wherever they go. Players will witness the devastating effects of their presence and may even come face-to-face with these abyssal entities. Confronting a Demon Lord is no small feat, and such encounters serve as climactic moments in the campaign, testing the players’ skills, resources, and courage to their limits.
The impact of Yeenoghu on the adventure
Yeenoghu, the Demon Lord of gnolls, plays a significant role in shaping the dangers and conflicts within the Underdark. His influence can be seen in the increased aggression and organization of gnoll packs, as well as the spread of his savage cult among other creatures. Players may encounter Yeenoghu’s followers or even stumble upon rituals and artifacts tied to this fearsome Demon Lord. The presence of Yeenoghu adds an extra layer of brutality and savagery to the already perilous Underdark, forcing players to confront the corrupting power of demonic influence.
Dealing with demonic influence in the Underdark
The pervasive influence of the Demon Lords affects every aspect of life in the Underdark during this adventure. Players will need to navigate the physical and psychological impacts of this demonic incursion, from battling corrupted creatures to resisting the madness that seeps into the very fabric of reality. The adventure introduces a Level of Madness mechanic, representing the toll that prolonged exposure to demonic influence can take on the characters’ minds. This adds an extra dimension of challenge and roleplaying opportunities, as players must not only fight external threats but also maintain their sanity in the face of cosmic horrors.
How does the adventure incorporate unique locations like Neverlight Grove and Sloobludop?
Exploring the fungal paradise of Neverlight Grove
Neverlight Grove is a fascinating and eerie location that showcases the alien beauty of the Underdark. This vast cavern is home to a thriving ecosystem of bioluminescent fungi and the peaceful myconid society. However, the influence of the Demon Lord Zuggtmoy, Lady of Fungi, has begun to corrupt this once-idyllic setting. Players exploring Neverlight Grove will encounter bizarre and potentially dangerous fungal growths, interact with the unique myconid culture, and uncover the insidious spread of Zuggtmoy’s influence. This location provides an excellent opportunity for surreal and atmospheric storytelling, challenging players’ perceptions and introducing them to the complex ecology of the Underdark.
Encountering the Pudding King and his minions
The Pudding King, a deranged myconid sovereign under the sway of Zuggtmoy, serves as a memorable antagonist within Neverlight Grove. This encounter allows players to witness firsthand the corrupting effects of demonic influence on the Underdark’s inhabitants. The Pudding King and his ooze-like minions present a unique combat challenge, forcing players to adapt their tactics and possibly find non-violent solutions to the conflict. This section of the adventure also provides opportunities for players to ally with uncorrupted myconids, adding depth to the moral choices and potential outcomes of their actions in Neverlight Grove.
Navigating the perils of Sloobludop
Sloobludop, a kuo-toa settlement on the shores of the Darklake, offers yet another distinct and perilous location for players to explore. This ramshackle village provides insight into the bizarre culture and religious practices of the kuo-toa, a race known for their ability to collectively will gods into existence through their belief. The arrival of Demogorgon has thrown Sloobludop into chaos, with different factions of kuo-toa vying for power and attempting to appease or control the Demon Prince. Players navigating this volatile situation must tread carefully, balancing diplomatic interactions with the potential for sudden violence. Sloobludop serves as an excellent example of how the demon lords’ presence has upset the delicate balance of power in the Underdark, creating opportunities for both danger and unlikely alliances.
In conclusion, Out of the Abyss offers a rich and immersive Dungeons & Dragons experience that challenges players on multiple levels. From the vast, interconnected world of the Underdark to the looming threat of demon lords, this adventure provides endless opportunities for exploration, combat, and roleplaying. The unique mechanics, such as the Pursuit Level system and the influence of madness, add depth and tension to the gameplay. Whether facing off against drow patrols, negotiating with myconid sovereigns, or confronting the terrifying might of Demogorgon, players will find themselves fully immersed in this epic journey through one of D&D’s most iconic and dangerous realms. For Dungeon Masters and players alike, Out of the Abyss promises an unforgettable campaign filled with darkness, danger, and the potentia for true heroism in the face of cosmi